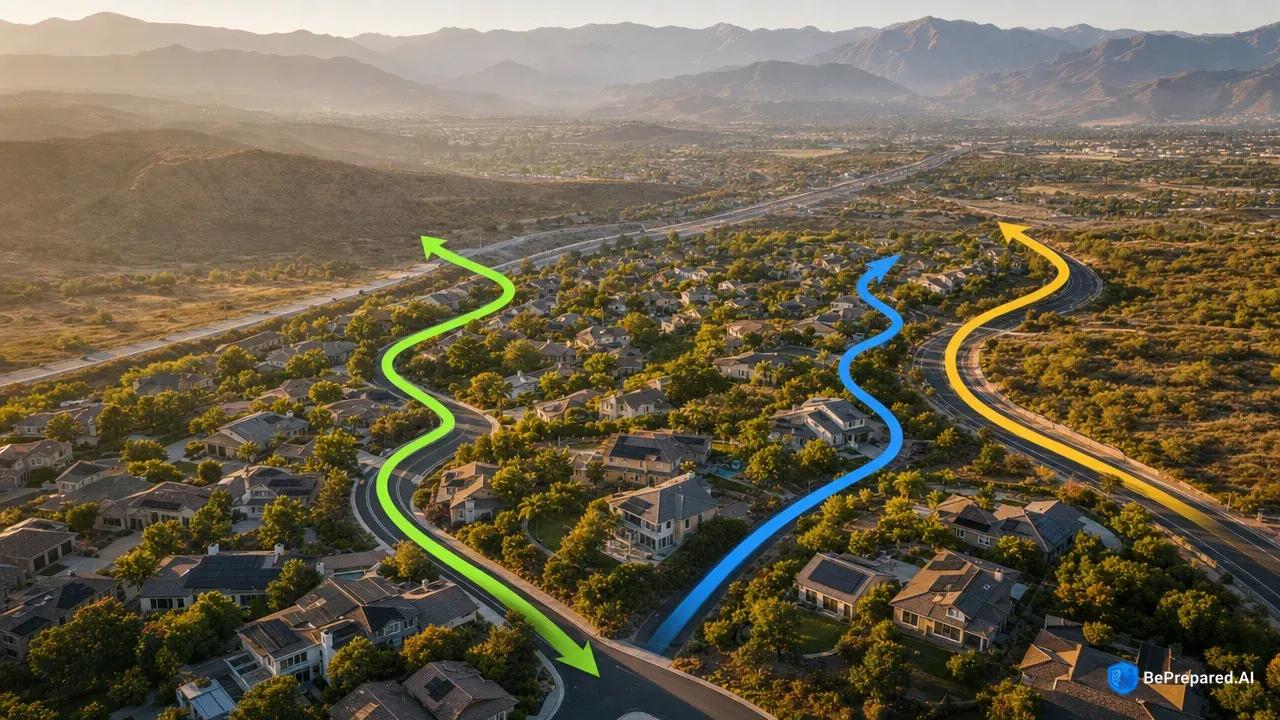
Why Multiple Evacuation Routes Are Critical for Wildfire Survival
The Martinez family learned a terrifying lesson during the 2018 Camp Fire: their carefully planned evacuation route had become a death trap. As flames roared down the hillside toward Paradise, California, the main road out of town transformed into a parking lot choked with abandoned vehicles and panicked residents. The family's single escape route—the one they'd driven hundreds of times—was now impassable. Only their neighbor's last-minute suggestion to take a little-known forest service road saved their lives.
This scenario plays out with frightening regularity during wildfire events. Wind-driven embers can travel miles ahead of the main fire front, and the window for safe evacuation shrinks dramatically. What seems like a comfortable cushion of time can evaporate in minutes as fire behavior changes with shifting winds, terrain, and fuel loads.
Both CAL FIRE and FEMA identify multiple evacuation routes as a cornerstone of wildfire survival planning . This isn't bureaucratic over-planning—it's a recognition of how quickly primary escape routes become compromised during actual wildfire events. Smoke obscures visibility, making familiar roads unnavigable. Fallen power lines block intersections. Traffic accidents create bottlenecks. Trees weakened by flames collapse across roadways. Each of these scenarios has killed people who had no alternative route planned.
The mathematics of survival are stark: having 2-3 planned routes increases your odds of successful evacuation significantly. Emergency services may issue evacuation orders, but during major wildfire events, they cannot guide individual evacuations. First responders are overwhelmed fighting the fire itself, rescuing trapped residents, and managing their own safety. You become your own incident commander, making split-second decisions about which route offers the best chance of survival. Those decisions are only possible if you've done the planning work before smoke fills the sky.
The difference between those who evacuate successfully and those who don't often comes down to preparation that happened months or years earlier. Multiple evacuation routes aren't just a good idea—they're the difference between driving to safety and making a desperate call to 911 from a car surrounded by flames.
- Route Diversity Benefits
- Multiple destination types reduce single-point-of-failure risks and provide options based on emergency type and traffic conditions
- Distance vs. Time Trade-offs
- Shortest route may not be fastest due to terrain and road conditions - factor both metrics into evacuation decision matrix
Mapping Your Primary and Secondary Routes
Spread a physical map of your area across your kitchen table. Now open the mapping application on your phone. You need both, because when cell towers fail during a wildfire emergency—and they frequently do—that digital map becomes useless. Physical maps don't depend on network connectivity or battery life, making them an essential backup tool that many modern families overlook.
Start your mapping process by identifying at least three different directions of travel from your property. This isn't about finding three roads that eventually merge onto the same highway—that defeats the purpose entirely. Routes should lead to different geographic areas to avoid single points of failure . If you live in a mountain community with valleys on the east and west sides, one route should lead east and another west. If you're in a coastal area, plan routes that head inland through different corridors. The goal is geographic diversity that ensures no single fire front can simultaneously block all your escape options.
Study the terrain carefully. A route that looks direct on a map might climb steep grades that slow traffic to a crawl during an evacuation. Road width affects evacuation speed and emergency vehicle access —a narrow two-lane road with no shoulder becomes a trap if a single vehicle breaks down or crashes. Mark these characteristics on your physical map using colored highlighters: green for wide, well-maintained roads; yellow for adequate but potentially congested routes; red for narrow or poorly maintained alternatives that should only be used as last resorts.
Pay attention to typical traffic patterns, but also consider how those patterns change during evacuations. Your normal commute route might be clear at 2 AM but become a parking lot when an entire community tries to use it simultaneously. Look for routes that access different highway systems or major roads. If your primary route feeds onto Highway 1, your secondary route should connect to a completely different highway or major arterial road.
Mark critical decision points where routes diverge. These are the intersections or landmarks where you'll need to make real-time choices during an evacuation. At the intersection of Pine Road and Valley Boulevard, you might decide between heading north toward the interstate or east toward the rural highway based on which direction the fire is moving. Document these decision points clearly on both your physical and digital maps, noting what factors should influence your choice at each one.
Create a route binder that includes printed maps with your routes highlighted, written directions for each route, and notes about landmarks or potential obstacles. Include photos of key intersections or turns that might be difficult to identify in heavy smoke. This binder should live in your vehicle during fire season, accessible to any family member who might need to drive to safety. Make copies for each vehicle your family owns, ensuring that everyone has access to the same information regardless of which car they're driving when evacuation orders come.
Test your routes during different seasons and times of day. What works in spring might become dangerous by late summer when vegetation has dried completely. A route that's clear on weekends might be congested during weekday rush hours. Drive each route at least twice—once during daylight and once after dark—to understand what navigation will actually be like during different scenarios.
Use our Natural Disasters plan builder to create a personalized preparedness plan based on your location and family needs.
Evaluating Route Vulnerabilities and Alternatives
Every evacuation route has vulnerabilities—the question is whether you've identified them before you're driving through smoke with flames visible in your rearview mirror. A systematic evaluation of each route's weak points allows you to make informed decisions about when to use which route and when to abandon a route that's becoming too dangerous.
Bridges and narrow passages create evacuation bottlenecks during emergencies , transforming what should be escape routes into potential traps. During the 2017 Tubbs Fire in Santa Rosa, California, several bridges became choke points where traffic slowed to a crawl, leaving evacuees vulnerable to the rapidly advancing fire. If your primary route includes a bridge, identify its load capacity and width. Is it a modern four-lane bridge that can handle heavy traffic flow, or a narrow two-lane structure built decades ago? Does your community have only one bridge crossing a river or ravine, making it a single point of failure? If so, your alternative routes must avoid that same bridge entirely.
Narrow canyons present another critical vulnerability. These natural funnels concentrate heat and smoke, creating conditions that can overwhelm evacuees even before flames arrive. Wind patterns in canyons are unpredictable and can shift rapidly, potentially driving fire toward you faster than you can drive away from it. The U.S. Fire Administration specifically warns about wildland-urban interface areas that pose higher risks for route blockage —and canyons represent some of the most dangerous interface zones. Evaluate whether your routes pass through canyon areas, and if they do, identify the length of canyon exposure. A half-mile canyon transit is very different from a five-mile journey through steep, vegetation-choked terrain.
Dense vegetation along roadsides creates multiple hazards. Trees weakened by drought or disease can fall quickly when heated by approaching fire. Brush and grass along road shoulders can ignite from embers, creating walls of flame on both sides of the road. When evaluating routes, drive them specifically to assess vegetation density and type. Grasslands cure to dry fuel by mid-summer in many regions, turning seemingly open areas into flash fire hazards. Mixed oak and chaparral creates intense heat when burning. Dense conifer forests produce enormous smoke volumes that reduce visibility to near zero. Note these vegetation characteristics for each route segment, understanding that they represent different types of dangers requiring different response strategies.
Wildland-urban interface zones—where homes meet wildland vegetation—concentrate risks in ways that affect evacuation route viability. These areas often have limited road networks because development followed natural terrain rather than planned grid patterns. Interface areas frequently feature ongoing development that can create temporary obstacles. That new housing development along your secondary route might have construction equipment blocking lanes or creating detours that aren't reflected on your maps.
Seasonal factors add another layer of complexity to route evaluation. A route that's perfectly viable in April might become extremely dangerous by August when vegetation has dried completely. Winter storms can damage roads, creating potholes or washouts that slow traffic. Spring runoff can make low-water crossings impassable. Fire danger levels themselves vary seasonally and should influence your route preferences—during red flag warning days with high winds, exposed routes become more dangerous than tree-lined alternatives, while on calm days the reverse might be true.
Document these vulnerabilities in your route binder with specific notes about conditions that would make each route inadvisable. For example: "Route 2 (Canyon Road): Do not use if winds exceed 25 mph or if fire is visible to the west. Narrow canyon from mile marker 3-7 with no turnouts. Heavy oak and manzanita brush both sides." This level of detail transforms your route plan from a simple map into a decision-making tool you can use under stress.
Power line corridors deserve special attention during your vulnerability assessment. While cleared areas under transmission lines might seem safer than heavily vegetated routes, downed power lines become deadly obstacles during wildfires. High winds and falling trees can bring lines down across roads, creating electrocution hazards that aren't immediately visible through smoke. Note where your routes pass under major transmission lines and consider whether alternative paths exist that avoid these corridors entirely.
Water availability along routes provides both opportunities and limitations. Routes that pass near lakes, reservoirs, or rivers offer potential refuge areas if you become trapped. However, these same water features may be crossed by limited bridge infrastructure, creating the bottleneck vulnerabilities discussed earlier. Map water sources along each route, noting access points where you could reach water if needed, but don't assume waterside locations are automatically safe—radiant heat and smoke can be deadly even near water.
Testing and Timing Your Evacuation Routes
You wouldn't run a marathon without training, yet many families plan evacuations without ever testing their routes under realistic conditions. The difference between a theoretical plan and a practiced plan often determines whether evacuation succeeds or fails when minutes count.
Drive each route completely during different times and conditions. Start with a leisurely weekend drive when you can focus on landmarks, road conditions, and potential obstacles without time pressure. Note the odometer reading at key decision points so you know exactly how far you've traveled. This baseline drive establishes your route knowledge and helps you identify features that might be difficult to spot during a stressful nighttime evacuation in heavy smoke.
Time your routes during both peak traffic hours and off-peak periods. Understanding how traffic patterns affect your evacuation time helps you make better decisions about when to leave. If you wait for an official evacuation order that comes at 5 PM on a weekday, your normal 20-minute drive might take significantly longer as you compete with commuter traffic plus other evacuees. Drive your routes during morning and evening rush hours, noting where congestion occurs and how much additional time you should budget. Document these times in your route binder: "Route 1: 18 minutes off-peak, 35-40 minutes during rush hour, add 10 minutes if school is in session."
Nighttime conditions dramatically change navigation difficulty. Landmarks visible during daytime become invisible at night. Street signs are harder to read. Smoke obscures even bright moonlight, creating near-total darkness. Drive your routes after dark, preferably on a moonless night, to understand what navigation will actually be like during a worst-case scenario. You'll discover that the "obvious" turn at the big oak tree isn't obvious at all when you can't see the tree. You'll find that certain intersections lack adequate lighting or signage. These discoveries should prompt you to identify alternative landmarks or navigation cues that work in darkness.
Load your vehicle with the emergency supplies and evacuation items you've prepared—go-bags, important documents, water, pet carriers, whatever you plan to take. Now drive your routes with this full load. You'll notice that acceleration may be slower, braking distances can increase, and handling changes, especially on curves or steep grades. If you drive an older vehicle or one with marginal mechanical condition, this testing might reveal performance limitations that should influence both your route choices and your vehicle maintenance priorities.
Practice with your entire family if possible, rotating who drives so that multiple household members know the routes firsthand. Your teenage driver needs to experience these routes just as much as you do. If you're injured or incapacitated during an evacuation, another family member may need to drive. Each person who might be behind the wheel should practice each route at least once.
Document everything you learn during these test drives. Create a route log that includes times under different conditions, specific challenges encountered, and any changes you want to make to your plan. This log becomes increasingly valuable over time as you accumulate data about seasonal variations, traffic patterns, and road condition changes. The goal is to remove as much uncertainty as possible, replacing guesswork with knowledge gained through actual experience.
Pay attention to fuel consumption during your test drives. Note how much gas each route requires and identify gas stations along the way. During evacuations, gas stations may be closed, out of fuel, or have long lines. Knowing your fuel requirements helps you decide whether to stop for gas or push through to your destination. Make it a practice to keep your vehicle's tank at least half full during fire season—that habit alone can mean the difference between reaching safety and running out of fuel on a blocked highway.
Weather conditions during testing should vary as much as possible. Drive routes in wind, rain, and fog to understand how visibility and handling change. While you can't safely test routes during actual wildfire conditions, experiencing them in other challenging weather gives you better intuition about how they'll perform when smoke reduces visibility or winds create hazardous driving conditions.
- Designated Assembly Point
- Central meeting location strategically positioned for safe regrouping and accountability checks
- Traffic Flow Analysis
- Route design prevents convergence conflicts by staggering exit points and timing sequences
Coordinating Routes with Family and Neighbors
The best evacuation plan falls apart if you're the only person who knows it. Wildfire evacuations often happen when family members are scattered at work, school, and home, making coordination both critical and challenging.
Share route plans with all household members and trusted neighbors. Every adult and teenage driver in your household should have their own copy of the route maps and written directions. Walk through the routes together using your maps, discussing decision points and what factors would lead you to choose one route over another. This isn't a one-time conversation—review routes together seasonally, especially before peak fire season begins. Make it part of your family's routine, like checking smoke detectors or reviewing emergency contacts.
Establish communication protocols for route changes because cell networks often become overwhelmed during wildfire emergencies. Cell towers may lose power or become saturated with traffic. Text messages may go through when voice calls fail, but even texts can be delayed by hours during major events. Create a communication hierarchy: try calling first, then texting, then using social media messaging apps that might route through different networks. Designate an out-of-area contact person who can serve as a communications hub—someone in another state who's unlikely to be affected by the same emergency and can relay messages between family members who can't reach each other directly.
Coordinate with neighbors to avoid route conflicts. Coordinated neighborhood evacuations reduce traffic congestion , and this coordination doesn't require complex planning. Simply knowing which routes your immediate neighbors plan to use allows you to choose different routes when possible, spreading traffic across available roads rather than concentrating it. If you and your three closest neighbors all plan to use the same primary route, consider whether some of you could designate different routes as your primary choice. This informal coordination can shave precious minutes off everyone's evacuation time.
Create backup plans for family members at different locations. Family members need individual route knowledge for workplace/school evacuations . Your spouse at work across town and your kids at school need their own evacuation plans that eventually connect with yours. Identify meeting points that make sense based on where people are when evacuation orders come. Don't assume everyone will make it home first—in rapid-onset wildfires, that assumption kills people who waste time trying to reunite before evacuating. Instead, plan for scenarios where each person evacuates from their current location and you meet at a predetermined safe location outside the evacuation zone.
These meeting points should be specific and memorable. "The parking lot at the Safeway on Miller Road in Pleasantville" is better than "somewhere in Pleasantville." Choose meeting points with multiple access routes so that people coming from different directions can all reach them. Identify both a primary and secondary meeting point in case the first becomes inaccessible. Program these locations into everyone's phones and write them on wallet cards that family members carry.
Practice your communication protocols before you need them. During a calm weekend, have family members try reaching each other using only the backup methods you've identified—no regular phone calls allowed. Can you successfully coordinate using text messages? Do the social media apps work reliably? Can your out-of-area contact person actually reach everyone? This practice reveals gaps in your plan while there's still time to fix them.
Discuss decision-making authority within your family. Who decides when to evacuate if you're not all together? Should each person make their own decision based on conditions at their location, or should someone have final authority? These conversations are uncomfortable but necessary. During the stress of an actual emergency, unclear authority creates dangerous delays as family members argue about what to do.
Consider vulnerable neighbors who might need assistance evacuating. Elderly residents, people with disabilities, or those without vehicles may need help. Knowing who needs assistance and having a plan to help them—or knowing they have other arrangements—prevents last-minute crises when you discover a neighbor can't evacuate independently. This doesn't mean you're obligated to risk your family's safety, but having the conversation beforehand clarifies expectations and allows people to make alternative arrangements if needed.
Use our guide to create a family emergency communication plan for backup contacts, meeting points, and essential information.
Maintaining and Updating Your Evacuation Plan
An evacuation plan is a living document that deteriorates without regular maintenance. Road conditions and infrastructure change regularly, affecting evacuation viability , and your plan must evolve to reflect these changes.
Seasonal Review Schedule:
Spring (March-April): Drive all routes to assess winter damage. Check for washouts, potholes, or debris from winter storms. Update contact information and verify that meeting points remain accessible. Review routes with family members as fire season approaches. This is the time to replace any worn maps or update printed directions that have become outdated.
Summer (June-July): Monitor vegetation growth along routes. Seasonal factors like vegetation growth can impact route safety , and areas that were clear in spring may have dense grass or brush by mid-summer. Check for road construction projects that might affect evacuation routes. Verify that all physical maps and route binders are in vehicles. Test your vehicle's air conditioning—you'll need it to keep smoke out during an evacuation.
Fall (September-October): Conduct full route tests including nighttime drives. Reassess based on any wildfires that occurred during the season, even if they didn't directly threaten your area. Update route documentation based on lessons learned from regional fire events. This is your last chance to make adjustments before the next fire season begins.
Winter (December-January): Review the past year's plan performance. Update any contact information that changed. Replace worn or outdated maps. Check that emergency supplies in vehicles are still functional and within expiration dates. Use this slower season to have detailed family discussions about what worked and what needs improvement.
Triggers for Immediate Updates:
Major road construction begins on or near any of your routes—verify detours and alternate paths immediately. Don't wait for your next seasonal review. Drive the affected area to understand how construction impacts travel time and identify temporary alternatives.
New development changes traffic patterns in your area—test routes during peak hours to assess impact. A new shopping center or housing development can dramatically alter traffic flow on roads you've been using for years.
Vegetation management projects close or restrict roads—identify temporary alternatives and note project completion dates. While these projects improve long-term safety, they create short-term obstacles that require plan adjustments.
Bridge or infrastructure repairs affect route accessibility—understand duration and plan accordingly. Some repairs take days; others take months. Your plan needs to reflect current conditions, not what you hope will be fixed soon.
Local wildfire events or near-misses reveal vulnerabilities—incorporate lessons learned immediately. If a nearby community evacuated and certain routes failed, assume those same vulnerabilities exist in your area and adjust your plan accordingly.
Infrastructure Change Monitoring:
Subscribe to your county's road maintenance notifications and local emergency management alerts. Follow your fire department and sheriff's office on social media—they often post about road closures and hazards faster than official channels. Join neighborhood social media groups where residents share real-time information about local conditions. Local knowledge from neighbors who drive these routes daily can alert you to changes you might otherwise miss.
Check your local government's website regularly for planned construction projects. Many counties publish annual road work schedules that allow you to anticipate disruptions months in advance. This proactive approach prevents surprises during fire season.
Post-Fire Analysis:
After any local wildfire events or near-misses, conduct a thorough review of your plan. Talk to neighbors who evacuated—what routes worked and which became impassable? Read after-action reports published by fire agencies. Local news coverage often includes details about which roads were blocked and when. Incorporate these lessons into your plan, adjusting route priorities and decision criteria based on real-world performance.
Attend community meetings where fire officials discuss recent events. These meetings often include information about evacuation challenges and infrastructure vulnerabilities that didn't make the news. The insights you gain can directly improve your plan's effectiveness.
Documentation Updates:
Replace physical maps annually—road maps become outdated as infrastructure changes. Update printed route directions whenever you modify routes. Verify that all family members have current copies of route information in their vehicles. Check that photos of key intersections still accurately reflect current conditions—new buildings or changed landscaping can make old photos misleading rather than helpful.
Date all your documentation so you know when it was last updated. A map marked "Updated March 2024" tells you at a glance whether it reflects current conditions or needs refreshing. This simple practice prevents you from relying on outdated information during an emergency.
Emergency Adaptations When Routes Are Compromised
Even with perfect planning, you may face situations where your prepared routes become unsafe during an actual evacuation. Evacuation route conditions can change within minutes during active wildfires , requiring rapid assessment and decision-making under extreme stress.
Recognize the signs that routes are becoming unsafe. Heavy smoke that reduces visibility below a quarter-mile makes driving extremely dangerous—you can't see obstacles, other vehicles, or the road edge. If you're driving into increasingly heavy smoke rather than away from it, your route is taking you toward the fire, not away from it. Visible flames on both sides of the road mean you're driving through the fire front, a situation with very low survival odds. Extreme heat that you can feel inside your vehicle indicates radiant heat from nearby flames that can ignite your vehicle. Falling debris—burning embers, branches, or power lines—suggests the fire is immediately adjacent to your route. Any of these signs demands immediate reassessment.
Quickly assess alternative paths during active evacuation by applying systematic decision criteria. First, determine your current location as precisely as possible—which road are you on and what's the nearest landmark or mile marker? Second, identify which direction the fire is moving based on smoke direction and visible flames. Third, recall which of your planned routes would take you away from that direction. If all planned routes are compromised, look for any road that leads away from the fire and toward areas you know to be less fire-prone—lower elevations, areas with less vegetation, or directions toward urban centers rather than wildland areas.
Trust your preparation when making these split-second decisions. The route testing you did months earlier gives you knowledge about road conditions, widths, and alternatives that other evacuees don't have. That knowledge becomes your competitive advantage when everyone is trying to escape simultaneously.
Sometimes you may need to consider whether continuing on a compromised route or seeking temporary shelter offers better survival odds. This is one of the most difficult decisions you'll face, as every instinct screams to keep moving. If conditions deteriorate to the point where you cannot see the road, where falling debris is striking your vehicle, or where flames are visible on all sides, continuing to drive may be more dangerous than stopping. Large parking lots away from vegetation, areas near bodies of water, or substantial commercial buildings might offer temporary refuge until conditions improve or emergency responders can reach you.
Real-time information during peak emergency periods may be limited or unavailable. Emergency management agencies become overwhelmed with incoming information and may not have current data on every road's status. This means you cannot rely on official sources to tell you which routes are clear. You must make decisions based on what you can observe directly and what you know about your routes from your previous planning and testing.
Maintain situational awareness by constantly processing information from multiple sources. Watch the smoke—its color, density, and direction of movement tell you where the fire is and how it's behaving. Listen to emergency radio broadcasts if possible, but don't depend on them exclusively. Trust your own observations about road conditions, visibility, and fire behavior. If something feels wrong—if the smoke is getting thicker instead of thinner, if you're seeing more embers instead of fewer—trust that instinct and be prepared to turn around or try a different route.
Pre-identify potential refuge areas along each route. These might include large parking lots away from vegetation, areas near bodies of water, or substantial commercial buildings. Knowing these options in advance gives you fallback positions if you need to wait for conditions to improve. During your route testing drives, note these potential refuge locations on your maps: "Mile 4.2: Large gravel lot on left, minimal vegetation, could use as refuge if needed."
Communication about route status becomes critical when family members are evacuating separately. If you discover a route is blocked, try to communicate this to other family members who might be planning to use it. Send text messages even if you're not sure they'll go through immediately—they may be delivered later when network capacity improves. Post updates to family group chats or social media. The out-of-area contact person you designated can serve as a relay point, collecting route status information from family members who successfully evacuate and passing it to those still in transit.
Keep your vehicle's windows closed and air conditioning on recirculate mode to minimize smoke entering the cabin. Turn on headlights to improve visibility to other drivers. If you must drive through heavy smoke, use the right edge line of the road as a guide—it's often more visible than the center line. Drive slowly enough that you can stop within the distance you can see clearly.
Have a backup plan for vehicle failure. Mechanical problems during evacuation are more common than people realize—overheating from slow-moving traffic, flat tires from debris, or running out of fuel. Know how to contact emergency services even if your phone has limited signal. Keep a charged backup battery for your phone. Carry a flashlight, water, and a cloth that can be wetted and used to filter smoke if you must exit your vehicle.
Weighing the Pros and Cons of Different Route Types
Understanding the advantages and disadvantages of different route types helps you make better decisions about which routes to prioritize in your planning and which to use during actual evacuations.
Highway and Interstate Routes:
Pros: Wide roads with multiple lanes allow faster travel and provide more room for emergency vehicles. Generally well-maintained with good signage. Often have lower vegetation density along shoulders. Higher capacity means they can handle more evacuation traffic before becoming congested.
Cons: Everyone knows about these routes, so they become congested quickly during evacuations. Limited exit points mean fewer options if you need to change routes mid-evacuation. May route through urban areas where traffic signals and intersections slow progress. Often represent longer distances than direct rural routes.
Rural and Back Roads:
Pros: Less traffic means faster travel when everyone else is stuck on highways. More route options and flexibility to change direction. Often more direct paths to safety. Local knowledge gives you an advantage over evacuees unfamiliar with the area.
Cons: Narrow roads with limited shoulders provide less room for error. Often have dense vegetation close to roadway. May have rough pavement or unpaved sections that slow travel. Limited or no cell service makes communication difficult. Fewer refuge areas if you need to stop.
Mountain Routes:
Pros: Elevation changes can take you above smoke layers. Often lead to areas with different vegetation types that may be less fire-prone. Spectacular views allow you to see fire behavior and make informed decisions.
Cons: Steep grades slow traffic, especially for heavily loaded vehicles. Switchbacks and curves limit speed. Rockfall and debris hazards increase during fires. Weather can change rapidly at elevation. Limited turnaround opportunities on narrow mountain roads.
Valley and Lowland Routes:
Pros: Generally flatter terrain allows faster, easier driving. Often follow waterways that provide natural firebreaks. Typically have better cell service and more developed infrastructure. More options for refuge areas.
Cons: Smoke settles in valleys, reducing visibility. Can become heat traps with limited air circulation. May have limited exit routes if valleys are narrow. Bridges over waterways create potential bottlenecks.
The best evacuation plan includes a mix of route types, giving you options that work under different fire behavior scenarios. A fire moving rapidly through grasslands requires different route choices than a fire burning through dense forest. Your route testing and documentation should note which route types you've selected and why, helping you make informed decisions when conditions deteriorate.
Taking Action: Your Next Steps
The time you invest now in understanding your routes, their vulnerabilities, and your alternatives becomes the resource you draw on when split-second decisions determine whether you drive to safety or become another statistic in the next after-action report.
Start this week by obtaining physical maps of your area. Spread them out and identify three potential routes that lead in different directions. This single action—taking 30 minutes to study maps and mark possible routes—puts you ahead of 80% of your neighbors who have no plan at all.
Schedule your first route test drive for this weekend. Don't wait for perfect conditions or complete planning. Drive one route from start to finish, noting landmarks, road conditions, and potential obstacles. Take photos of key intersections. Write down your observations. This practical experience is worth more than hours of theoretical planning.
Have the evacuation conversation with your family this month. Gather everyone together, show them your maps, and discuss meeting points and communication protocols. Make it clear that this isn't optional preparation—it's essential survival planning that could save their lives.
Set calendar reminders for seasonal route reviews. Put them in your phone right now: March 15, June 15, September 15, December 15. When those reminders pop up, actually do the reviews. Plans that aren't maintained become obsolete, and obsolete plans fail when you need them most.
Connect with neighbors about evacuation coordination. You don't need a formal neighborhood meeting—just casual conversations about which routes people plan to use. This informal coordination reduces congestion and might reveal route options you hadn't considered.
Multiple evacuation routes aren't paranoia—they're pragmatism. They're the recognition that wildfires are faster, more unpredictable, and more dangerous than most people realize until they're fleeing for their lives. The difference between those who evacuate successfully and those who don't often comes down to preparation that happened long before the first ember fell.
The Martinez family survived because someone had knowledge of an alternative route. You can't count on that kind of luck. You need your own knowledge, your own tested routes, your own practiced plan. Start building that foundation today, because fire season doesn't wait for anyone to be ready.