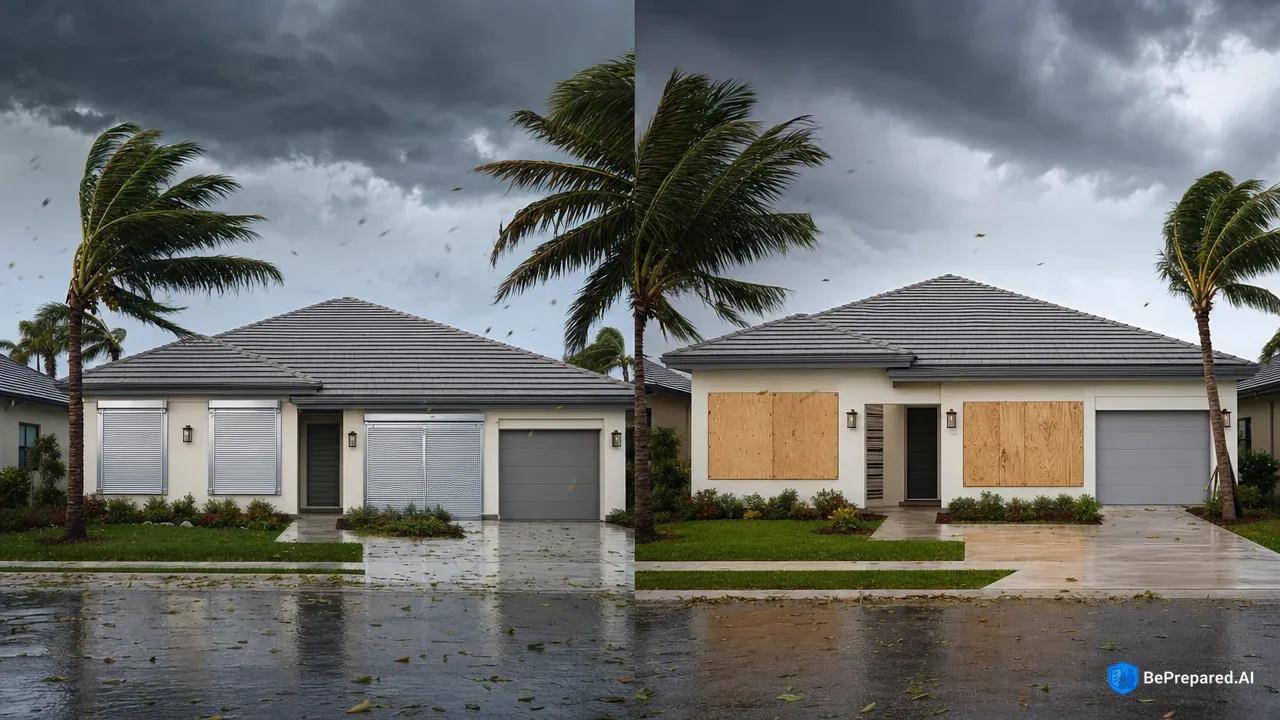
Hurricane Window Protection: Making the Right Choice for Your Home
The Martinez family watched from their evacuation shelter as Hurricane Michael's eyewall crossed Mexico Beach, Florida. When they returned three days later, their neighbor's house stood mostly intact while homes on either side lay in ruins. The difference? Their neighbor had protected every window. The other homes had lost windows early in the storm, allowing hurricane-force winds to enter and literally blow the roofs off from the inside.
This scenario plays out repeatedly during major hurricanes, and the statistics are sobering. Most hurricane damage occurs when windows fail and allow wind inside the structure . Your home transforms from a protective shell into a pressure vessel ready to explode. Once wind enters through a broken window, the internal pressure increases dramatically, pushing upward on the roof and outward on walls. What started as a broken window quickly becomes catastrophic structural failure.
The threat to your windows comes from multiple directions during a hurricane. Hurricane winds can turn everyday objects into deadly projectiles that break unprotected windows. That patio chair you forgot to secure becomes a battering ram traveling at 100 miles per hour. Tree branches, roof tiles from neighboring homes, and debris from damaged structures all become airborne missiles seeking the weakest points in your home's envelope—your windows.
You have options for protecting these vulnerable entry points. Two primary methods have proven effective over decades of hurricane experience: plywood boarding and permanent storm shutters. Each approach offers distinct advantages and challenges. Understanding these differences will help you make the right choice for your specific situation. The decision isn't simply about budget—it involves considering your physical capabilities, the frequency of hurricane threats in your area, storage limitations, and how quickly you can deploy protection when a storm approaches.
Here's the key insight that many homeowners miss: the protection system you'll actually use correctly when the next storm forms in the Gulf or Atlantic is the one that matters. Having expensive shutters that remain undeployed or plywood panels that never get installed provides exactly zero protection. Your choice must align with your reality—your physical abilities, your schedule, your storage capacity, and your commitment to preparation.
Plywood Protection: The Budget-Conscious Temporary Solution
Plywood boarding represents the traditional, time-tested approach to hurricane window protection that has saved countless homes over generations. This method involves cutting sheets of plywood to fit over each window and door opening, then fastening them securely to the structure before the storm arrives. While it requires more hands-on effort than permanent systems, plywood protection remains popular because it works when done correctly.
The specifications matter tremendously here. FEMA recommends 5/8-inch exterior grade plywood as minimum thickness for hurricane protection . Don't let a hardware store employee talk you into half-inch plywood to save a few dollars—that quarter-inch difference determines whether your protection holds or fails under hurricane-force winds. Plywood should be exterior grade (CDX) 5/8-inch thick . Exterior grade or marine plywood resists moisture better than interior grades, which matters since these panels will face driving rain and humidity. The plywood should be marked "CDX" or "exterior grade" on the stamp.
The preparation process begins well before hurricane season. Plywood panels must be cut to fit and ready to install before a hurricane approaches . This means measuring every window and door opening precisely, adding at least four inches of overlap on all sides to ensure adequate fastening area. Each panel needs clear labeling—you don't want to puzzle out which piece goes where when winds are already picking up. Many experienced homeowners paint their panels white to reflect heat and number them with permanent marker to match a diagram of their home.
Fastening technique separates effective protection from false security. Your panels need attachment with permanent anchors installed into the wall structure, not just screwed into stucco or siding. For masonry walls, this typically means concrete anchors or expansion bolts installed around the perimeter of each opening. For wood-frame construction, screws must penetrate into studs or solid backing. The fasteners themselves should be at least 2-1/2 inches long and corrosion-resistant. Some homeowners install permanent mounting clips that remain in place year-round, allowing panels to slide into position and secure with wing nuts—this eliminates the need to drill new holes with each installation.
Storage presents a practical challenge that shouldn't be underestimated. A typical three-bedroom home may require numerous sheets of plywood to protect all openings. These panels need storage space protected from weather and moisture—a garage, shed, or under-house storage area. Storing them flat prevents warping, but that requires significant floor space. Leaning them against walls works if you ensure good air circulation and keep them off direct contact with concrete floors, which can wick moisture into the wood.
The labor requirement is substantial and time-sensitive. Plywood installation requires two or more people working together for several hours. You're handling large, awkward panels while working on ladders, aligning holes, and driving fasteners. This physical demand increases dramatically if you're racing against an approaching storm deadline. Consider whether you'll have help available when needed—if your adult children live out of state or your spouse has physical limitations, you need a backup plan.
Plywood protection offers the lowest initial investment. Materials for a typical home run between $400-$700, depending on the number and size of openings. You'll need the plywood sheets, fasteners, and possibly mounting hardware. This compares favorably to thousands of dollars for permanent shutters. However, this calculation requires honest assessment of replacement costs. Plywood stored in humid climates can deteriorate over time. The edges may swell, the panels can warp slightly, and the wood may weaken. Experts often recommend inspecting plywood panels regularly and replacing them when they show signs of degradation, meaning your lower-cost solution has potential ongoing costs.
- Accordion Shutters
- Permanently mounted track system that unfolds horizontally across openings. Easy one-person operation with locking mechanisms. Cost-effective for multiple windows.
- Roll-Down Shutters
- Motorized or manual crank system stored in overhead housing. Provides complete coverage and insulation benefits. Higher upfront cost but maximum convenience.
- Bahama Shutters
- Top-hinged louver design that provides shade when open and protection when closed. Enhances curb appeal with tropical aesthetic. Limited to specific architectural styles.
- Colonial Shutters
- Side-hinged panels that swing closed over windows. Traditional appearance complements historic and classic home designs. Requires adequate wall space for operation.
- Panel Shutters
- Removable flat panels stored separately when not in use. Most economical option with versatile sizing. Requires advance preparation and physical installation during storms.
- Comparative Analysis
- Installation complexity, maintenance requirements, wind rating certifications, and long-term durability factors. Includes cost-benefit analysis and building code compliance considerations.
Pros and Cons of Plywood Protection
Advantages:
- Lowest upfront cost among all protection methods
- Widely available materials at hardware stores
- Can be cut and customized to fit any opening size
- Proven effective when properly installed
- No visible impact on home appearance when not in use
Disadvantages:
- Requires significant physical labor and time to install
- Needs two or more people for safe installation
- Requires substantial storage space
- May need replacement after several years in humid climates
- Must be installed well in advance of storm arrival
- Blocks all light and ventilation once installed
- Fastener holes can weaken wall structure over time
Storm Shutters: The Permanent Protection Investment
Storm shutters represent a different philosophy entirely—investing upfront for long-term convenience, superior protection, and peace of mind. Once professionally installed, these systems remain ready to deploy at a moment's notice, eliminating the frantic pre-storm scramble that plywood requires. Permanent storm shutters offer the best protection for windows according to FEMA . Storm shutters can be deployed quickly without requiring storage space or manual cutting .
The shutter landscape offers multiple options, each with distinct characteristics. Accordion shutters unfold from a permanent track mounted beside each window, pulling across the opening and locking in place. They're among the most popular residential options because they balance cost, convenience, and protection effectively. A homeowner can deploy accordion shutters for an entire house in 30-45 minutes without ladders or assistance. They remain visible when not in use—folded beside windows like permanent architectural features—which some homeowners consider aesthetically unpleasing but others view as a visible deterrent to storm damage.
Roll-down shutters represent the premium option, rolling up into a housing box mounted above each window. Deployment involves simply lowering the shutter—either manually with a crank or via electric motor for the ultimate convenience. These shutters completely disappear when not in use, maintaining your home's appearance. The electric motorized versions allow you to protect your entire home with the push of a button, which proves invaluable if you need to evacuate quickly or if you're already away when a storm threat emerges. Some systems even connect to smartphone apps, letting you deploy shutters remotely. The tradeoff? Roll-down shutters cost two to three times more than accordion styles.
Bahama shutters mount at an angle above windows, propped open to provide shade during normal conditions and lowered flat against windows when storms approach. These shutters originated in Caribbean architecture and add distinctive tropical character to homes. They provide year-round benefits through energy savings and UV protection, making them popular in Florida and Gulf Coast states. The downside is they're visible year-round—you're committing to a specific architectural aesthetic. They also require more wall space above windows for mounting.
Colonial shutters look like traditional decorative shutters but are built from heavy-gauge aluminum with reinforced hinges. During normal conditions, they're latched open against the exterior walls. When a storm approaches, you swing them closed and secure them with a locking bar. Colonial shutters offer the most traditional appearance and can actually enhance home aesthetics. However, they require manual operation for each window, and homes with many windows make deployment time-consuming. They also need adequate wall space beside each window for the open shutters.
Panel systems fall between plywood and permanent shutters in both cost and convenience. These are manufactured aluminum or steel panels that attach to permanent tracks installed around each opening. Unlike plywood, they're lightweight, don't deteriorate in storage, and install much faster. Unlike other shutter types, they're removed and stored between storms. Panel systems cost more than plywood but less than accordion shutters, making them a middle-ground option. They still require physical effort and storage space, but far less than plywood.
Professional installation is standard for most permanent shutter systems. This isn't a weekend DIY project—proper installation requires structural knowledge, specialized tools, and experience with building codes. The installer must identify solid mounting points in your home's structure, ensure proper spacing of fasteners, verify that shutters seal correctly, and test deployment mechanisms. This professional installation ensures your protection will perform when tested by hurricane-force winds, though it adds to the overall project cost.
The convenience factor cannot be overstated. When the National Hurricane Center issues a watch for your area, you're not frantically hunting for plywood panels or scrambling up ladders. You're calmly deploying shutters in a fraction of the time, leaving more hours for other preparations or evacuation if necessary. This time advantage becomes critical during rapidly intensifying storms that give limited warning.
Pros and Cons of Storm Shutters
Advantages:
- Quick deployment without ladders or assistance
- No storage space required (except panel systems)
- Durable construction lasts decades with minimal maintenance
- Can be deployed by elderly or single homeowners
- Insurance discounts often available
- Increases home resale value
- Can be deployed at the last safe moment
- Professional installation ensures proper protection
Disadvantages:
- Higher upfront investment cost
- Visible on home exterior (except roll-down type)
- Requires professional installation in most cases
- Motorized systems need electrical maintenance
- Some types require manual operation of each window
- May not match all architectural styles
- Cost Comparison Analysis
- Initial investment and long-term costs for plywood ($50-150 per window) versus storm shutters ($200-800 per window) with ROI calculations
- Installation & Labor Requirements
- Time investment comparison: plywood installation (30-45 min per window, seasonal) versus one-time shutter installation (2-4 hours per window)
- Storage & Maintenance Needs
- Space requirements for plywood sheets versus permanent shutter storage, plus annual maintenance and replacement schedules
- Protection Level & Durability Ratings
- Wind resistance ratings, debris impact protection, and lifespan comparison with visual performance scales for each option
- Convenience & Deployment Speed
- Storm preparation time requirements and physical demands for emergency deployment of each protection method
- Situation-Based Recommendations
- Tailored guidance for budget-conscious homeowners, frequent travelers, elderly residents, and high-risk coastal properties
Cost Analysis: Initial Investment vs Long-Term Value
The financial comparison between plywood and shutters extends far beyond initial purchase price. Understanding the total cost of ownership over a decade or more reveals the true economic picture and helps you make a decision based on actual value rather than sticker shock.
Plywood protection costs vary based on window size and local lumber prices. For a typical home with 12 windows and two glass doors, you're looking at $400-$1,000 in materials plus fasteners and mounting hardware. This assumes you're doing the installation yourself—hiring help for installation adds several hundred dollars per storm event depending on your location and the number of openings. That initial cost advantage looks compelling compared to shutters, but the calculation doesn't end there.
Plywood panels stored in humid coastal climates may show signs of degradation over time. Moisture can cause swelling, warping, and delamination. Fastener holes may elongate from repeated installation and removal. The wood can weaken structurally. Regular inspection helps identify when panels need replacement, but this represents an ongoing cost consideration that should factor into your long-term planning.
Storm shutters range from $200-800+ per window depending on type and features . Accordion shutters represent the mid-range option, while roll-down shutters command premium prices. Motorized roll-down systems add significant cost for the motor and controls. For that same 12-window, two-door home, you're looking at total costs ranging from $3,500 for basic accordion shutters to $15,000+ for motorized roll-downs.
Those numbers cause sticker shock, but consider the lifespan. Quality storm shutters can last for decades with minimal maintenance. Accordion shutters need occasional lubrication and track cleaning. Roll-down shutters benefit from annual inspection and adjustment. But there's no replacement cost, no degradation, no ongoing material investment. Your shutter installation protects your home for many years without additional expense.
Many insurance companies offer discounts for homes with permanent storm protection systems . These discounts can range from 10-45% on the windstorm portion of your homeowner's policy, depending on your location, insurer, and the type of protection installed. In hurricane-prone areas where windstorm coverage might cost $2,000-$4,000 annually, these discounts provide substantial savings. Over a 20-year period, those savings can offset a significant portion of your shutter investment.
Factor in your time and physical effort as well. If you value your time at even $25 per hour, and plywood installation takes 6 hours per storm, that's $150 in labor value. Multiply that by the 3-5 storms you might prepare for over a decade, and you've invested considerable time. Shutters deploy in under an hour, saving 5 hours per event. Over multiple storm preparations, this adds up to real value.
The calculation becomes even more favorable for shutters when you consider opportunity cost. Those hours spent wrestling plywood panels could be spent on other critical preparations—securing outdoor items, reviewing evacuation routes with family, organizing important documents, or simply reducing stress during an already anxious time. The mental burden of knowing you face hours of physical labor before each storm shouldn't be discounted.
Property value impact deserves consideration too. Permanent storm protection systems can increase home value and marketability in hurricane-prone regions. When buyers compare similar homes, the one with shutters already installed may command a premium—potentially recovering much of the installation cost at resale. Plywood panels sitting in your garage don't add resale value.
Installation Requirements and Timeline Considerations
The practical reality of deploying your chosen protection system determines whether it actually protects your home when storms threaten. Understanding installation requirements and timing constraints helps you select an option you'll use correctly every time.
Plywood installation follows a specific sequence that can't be rushed safely. First, you retrieve panels from storage and match them to their designated openings using your labeling system. Next, you position the first panel over its opening—this typically requires two people since panels are large and awkward, especially on ladders. One person holds the panel in position while the second aligns fasteners with pre-drilled holes or mounting brackets. Then you drive each fastener, working around the perimeter to ensure even pressure and proper sealing. Repeat this process for every window and door.
For a typical home, plywood installation requires 2-4 hours with two people working efficiently . Add time for any complications—stripped screws, misaligned holes, warped panels, or difficulty accessing second-story windows. If you're working alone, double those time estimates at minimum. If you're working in deteriorating weather conditions as the storm approaches, add more time for safety precautions and difficult working conditions.
The critical timing constraint is this: you need to complete installation with adequate time before dangerous conditions arrive. Working on ladders in strong winds is dangerous. Since conditions can deteriorate faster than forecast, you need to complete installation well before the projected arrival time. This means starting your installation early enough to allow for complications and ensure you're not rushing.
That timeline creates pressure. If a storm intensifies rapidly or shifts track unexpectedly, your window of safe installation time shrinks. If you work during the week and the storm approaches midweek, you might need to leave work early or take time off. If you're elderly or have physical limitations, you might need to hire help—but so does everyone else, and contractors book up quickly when storms threaten.
Storm shutters eliminate most of these timing pressures. Accordion shutters deploy in 20-40 minutes for an entire home . You simply walk around your house, unfolding each shutter across its opening and securing the locking mechanism. No ladders, no heavy lifting, no assistance needed. Roll-down shutters deploy even faster—5-15 minutes for manual systems, under 5 minutes for motorized systems. This speed advantage provides enormous flexibility in your storm preparation timeline.
The safety factor matters tremendously. Deploying shutters doesn't involve climbing ladders in gusty winds or wrestling heavy panels overhead. Elderly homeowners can deploy accordion or roll-down shutters independently. If you need to evacuate quickly as a storm intensifies, you can deploy shutters and leave within an hour. If you're traveling when a storm threat emerges, a neighbor can deploy your shutters quickly, or you can activate motorized shutters remotely.
One critical myth needs debunking here: tape does not prevent windows from breaking and should never be relied upon for protection . Despite this appearing in old movies and persisting in popular belief, taping windows provides zero structural protection against hurricane winds or debris. In fact, tape may create larger, more dangerous shards when windows break. Don't waste time or money on tape—invest in real protection.
The deployment decision point also differs between systems. With plywood, you must commit to installation early because the process takes hours. Once installed, you're living in darkness until the threat passes—plywood blocks all light and ventilation. This means you might install protection for a storm that ultimately misses your area, resulting in several days of living in a darkened house unnecessarily. With shutters, you can wait longer to make the deployment decision since the process is quick. You can monitor the forecast, deploy shutters at the last safe moment, and avoid unnecessary deployments for storms that shift away.
Making Your Decision: Factors to Consider
Choosing between plywood and shutters isn't a purely financial calculation—it's a personal decision that should reflect your specific circumstances, capabilities, and priorities. Several key factors should guide your choice.
Physical capability stands as perhaps the most important consideration. Be honest with yourself about your current fitness level and how it might change over the next decade. Installing plywood requires climbing ladders while handling large panels, working overhead with power tools, and maintaining balance in potentially windy conditions. If you're currently in your 60s, will you be able to safely perform this work in your 70s? If you have back problems, arthritis, or other physical limitations, plywood installation might be impractical or dangerous. Protection you can't physically install provides no protection at all.
Hurricane frequency in your specific location significantly impacts the value equation. If you live in South Florida, the Gulf Coast of Texas, or coastal Louisiana—areas that face hurricane threats almost every season—you might prepare for storms 3-5 times per year. Over a decade, that's 30-50 installations with plywood versus simple shutter deployments. The cumulative time, effort, and physical wear make shutters increasingly attractive. Conversely, if you're in an area that faces hurricane threats once every 3-5 years, the infrequent use might justify the plywood approach.
Storage space availability poses a practical constraint. Plywood protection for a typical home requires storing numerous large panels plus fasteners and tools. If you have a spacious garage, dedicated shed, or under-house storage, this might work fine. But if you're in a condo with limited storage, or your garage is already packed with vehicles and belongings, storing plywood becomes problematic. Shutters eliminate this issue entirely—panel systems require some storage but far less than plywood, while accordion and roll-down shutters need no storage space.
Family situation and support network matter considerably. If you have adult children or neighbors who can reliably help with plywood installation, the labor burden decreases significantly. If you're elderly and living alone, or if your spouse can't assist with physical work, plywood installation becomes much more challenging. Consider not just your current situation but how it might change—children move away, neighbors relocate, physical capabilities decline. Shutters provide independence from these variables.
Long-term planning horizon should influence your decision. If you're planning to sell your home within 3-5 years, the lower upfront cost of plywood might make sense—though remember that shutters can add resale value. If this is your long-term home where you plan to retire, the convenience and longevity of shutters become more valuable. The total cost of ownership calculation shifts dramatically depending on your timeline.
Budget constraints are real and valid. If you simply cannot afford $5,000-$10,000 for shutters right now, plywood protection is infinitely better than no protection. However, consider whether you could install shutters gradually—perhaps protecting the most vulnerable windows first (those facing the prevailing storm direction) and adding more coverage over several years. Some homeowners mix approaches, using shutters for first-floor windows where convenience matters most and plywood for second-story windows accessed less frequently.
Risk tolerance plays a role too. Shutters provide more reliable protection because they're professionally installed and tested. They're engineered specifically for hurricane protection, with known wind ratings and building code approval. Plywood protection, while effective when done correctly, introduces more variables—Did you use thick enough plywood? Are your fasteners properly spaced? Did moisture weaken the panels? If you're risk-averse and want maximum confidence in your protection, shutters offer greater assurance.
Consider also your evacuation strategy. If your plan is to always evacuate for major hurricanes, you need protection you can deploy quickly before leaving. Spending 4-6 hours installing plywood cuts significantly into your evacuation timeline and might force you to leave with an unprotected home. Shutters allow you to protect your home and evacuate the same day if necessary.
Taking Action: Implementation and Preparation Steps
Regardless of which protection method you choose, success depends on preparation completed during calm weather, well before any storm threatens. Hurricane protection should be planned and prepared during calm weather, not when a storm is approaching . Both plywood and storm shutters require advance preparation to be effective . Here's how to move from decision to readiness.
Start by creating detailed measurements of every opening requiring protection. Measure each window and door precisely, recording width and height. For plywood, add at least 4 inches to each dimension to ensure adequate overlap for fastening. For shutter quotes, exact measurements ensure accurate pricing and proper fit. Don't rely on architectural plans—measure each opening individually since actual dimensions often vary from plans. Photograph each opening from multiple angles to reference later when planning installation or discussing options with contractors.
Develop a comprehensive material list if you're going the plywood route. Calculate the number of 4x8-foot plywood sheets needed based on your measurements, accounting for waste and irregular cuts. List all fasteners, mounting hardware, tools, and supplies required. Include extras—you don't want to discover you're three screws short when installing protection as a storm approaches. Create a detailed installation diagram showing which panel goes where, with clear numbering or labeling. This document becomes your installation manual when you're working under time pressure.
Establish relationships with contractors and suppliers early, well before hurricane season begins. If you're installing shutters, get multiple quotes from licensed, insured installers with verifiable references. Check their work during the off-season when they're less busy and can give your project proper attention. Verify that they pull proper permits and that their work meets Florida Building Code or your local requirements. For plywood, identify which local suppliers stock the materials you need and confirm availability—during storm threats, plywood sells out quickly.
Practice your installation procedure during calm weather. If you've chosen plywood, do a complete practice installation on a weekend in April or May. Time yourself, identify any problems with panel fit or fastener alignment, and make adjustments while you have time. This practice run reveals issues you can fix now rather than discovering them when a storm is 48 hours away. Take photos of the process to create a visual reference guide. If you've installed shutters, practice deploying and securing them until the process becomes routine. Know exactly how each locking mechanism works and verify that all tracks are clear and functional.
Create a detailed family emergency plan that accounts for protection deployment time. Your plan should specify who's responsible for deploying protection, how long it will take, and at what point in the storm timeline deployment must begin. Include backup plans if the primary person responsible isn't available. Integrate protection deployment with your other preparation activities—securing outdoor items, preparing emergency supplies, reviewing evacuation routes. A written timeline prevents confusion and ensures nothing gets forgotten in the stress of storm preparation.
Consider taking your preparation a step further by documenting your protection system. Photograph your home with shutters deployed or plywood installed. Create a video walkthrough explaining your system. This documentation serves multiple purposes—it helps family members understand the process, provides evidence for insurance purposes if needed, and creates a reference if you need to hire help for installation.
Schedule annual maintenance during the off-season. For shutters, this means cleaning tracks, lubricating moving parts, checking locking mechanisms, and verifying that all hardware remains secure. For plywood, inspect panels for warping, moisture damage, or delamination. Check that all fasteners and mounting hardware remain in good condition. Replace any degraded components before they fail during actual use. This annual review ensures your protection system will work when needed.
Build relationships with neighbors and create mutual aid agreements. Perhaps you can help elderly neighbors deploy their protection in exchange for assistance with your own preparations. Community resilience makes everyone safer and reduces the burden on any individual household. Share knowledge, tools, and labor to ensure the entire neighborhood is prepared.
Stock up on essential supplies during the off-season when prices are lower and selection is better. This includes fasteners, drill bits, lubricants for shutters, and any replacement parts you might need. Having these items on hand prevents last-minute shopping trips when stores are crowded and supplies are depleted.
Test your system under realistic conditions. Deploy your full protection system during a calm weekend and leave it in place for 24 hours. This reveals any issues with ventilation, lighting, or access that you'll need to address. It also builds your confidence in the system and helps you refine your deployment process.
Document your insurance coverage and understand exactly what protection qualifies for discounts. Contact your insurance agent to verify that your chosen protection method meets their requirements for premium reductions. Get written confirmation of any discounts and keep this documentation with your policy.
Create a deployment checklist that you can follow step-by-step when a storm threatens. This list should include every task, in order, with time estimates for each. Include items like "retrieve panels from storage," "install north-facing windows first," and "verify all locks engaged." A detailed checklist prevents you from forgetting critical steps when you're working under pressure.
Ready to take the next step? Create a personalized preparedness plan based on your location and family needs to prepare your home, supplies, evacuation plans, and recovery steps.
Final Recommendations
The decision between plywood and storm shutters ultimately comes down to matching protection method to your specific circumstances. Both can effectively protect your windows when properly deployed, but they demand different commitments of time, money, and physical effort. The worst choice is no choice—waiting until a storm threatens to figure out your protection strategy.
Your windows represent the most vulnerable points in your home's hurricane defense. Protecting them isn't optional if you want to avoid catastrophic damage. Whether you choose the budget-conscious plywood approach or invest in permanent shutters, the key is making that decision now, during calm weather, and preparing your system completely before hurricane season arrives.
For homeowners on tight budgets or those who face infrequent hurricane threats, plywood protection offers a viable solution. The key is committing to proper preparation—buying the right materials, pre-cutting panels, installing mounting hardware, and practicing deployment before you need it. Don't cut corners on plywood thickness or fastener quality. Store your panels properly and inspect them annually for degradation.
For homeowners who can afford the investment, permanent shutters provide superior convenience and long-term value. The time savings, ease of deployment, and insurance discounts make them increasingly attractive the longer you own your home. Choose the style that matches your budget and aesthetic preferences, but prioritize ease of deployment over appearance—the best shutters are the ones you'll actually use.
Consider a hybrid approach if budget constraints are significant. Install permanent shutters on your most vulnerable windows—those facing the prevailing storm direction or on the first floor where deployment is easiest. Use plywood for less critical openings or second-story windows you access infrequently. This strategy provides the convenience of shutters where it matters most while keeping costs manageable.
Whatever you choose, act now. Don't wait until June when hurricane season begins. Don't wait until a storm forms in the Caribbean. Make your decision, acquire your materials or install your shutters, and practice your deployment process. The life you save and the home you protect will be your own.