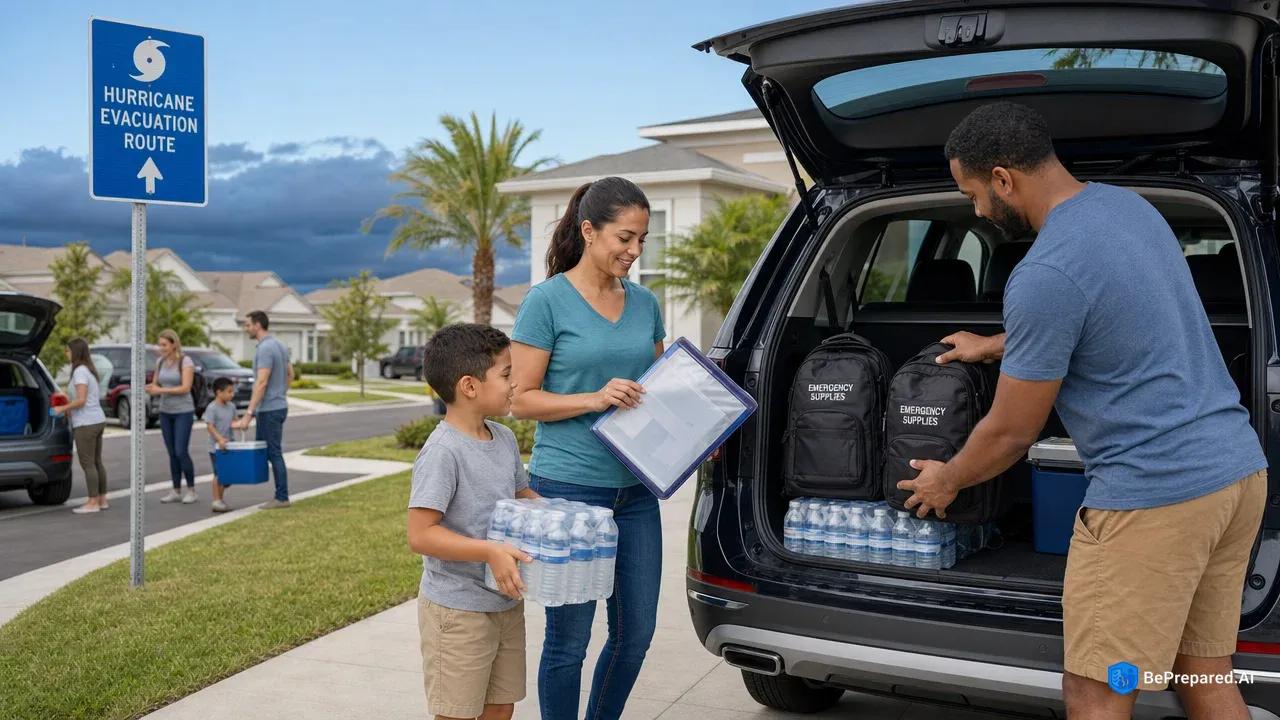
When Every Minute Counts: Your 30-Minute Hurricane Evacuation Guide
The text alert hits your phone at 4:47 PM on a Tuesday: "Mandatory evacuation ordered for coastal zones. Hurricane expected to make landfall within 36 hours." Your heart races as you look around your home, suddenly overwhelmed by the question that paralyzes so many families in this moment: What do we take?
This scenario plays out thousands of times each hurricane season along coastal communities. While FEMA recommends having an evacuation plan ready before hurricane season begins , many families find themselves scrambling when that alert arrives. The clock starts ticking, traffic builds up, and the chaos of last-minute preparations can shrink your window fast.
Here's the good news: you don't need hours to evacuate effectively. With a systematic 30-minute approach, you can gather everything your family truly needs to stay safe and comfortable during displacement. This isn't about grabbing everything you own or making perfect decisions under pressure. It's about having a clear roadmap that removes panic from the equation and ensures you prioritize life-critical items first, then comfort items as time allows.
Think of evacuation like organizing your kitchen junk drawer—you tackle the most important stuff first, then work your way through the rest. Let's walk through exactly what to do in those crucial 30 minutes, broken down into manageable five and ten-minute blocks that will transform chaos into calm, methodical action.
- Waterproof Document Folder
- Keep copies of insurance papers, birth certificates, and passports in a sealed, waterproof container
- Prescription Medications
- At least 7 days' worth of essential medications in original bottles with current labels
- Cash and Cards
- Small bills and coins plus credit/debit cards - ATMs may not work during emergencies
- Phone Chargers
- Portable battery pack and charging cables to keep communication devices powered
- Identification Documents
- Driver's license, ID cards, and any special permits you need for travel or shelter access
- Medical Alert Items
- Medical bracelets, allergy information cards, and emergency contact lists
The Critical First 10 Minutes: Life-Safety Essentials
Your first ten minutes should focus exclusively on items you absolutely cannot replace or function without. These are your life-safety essentials, and ideally, they should already be organized in a grab-and-go container that lives in an easily accessible location year-round.
Priority 1: Critical Documents (Minutes 1-3)
Head straight for your document safe or fireproof box. The CDC recommends keeping important documents in waterproof containers , and this moment is exactly why. Grab your waterproof document holder containing:
- Birth certificates, Social Security cards, and passports for every family member
- Property deeds, mortgage documents, and home insurance policies
- Medical insurance cards and vaccination records
- Recent bank statements and investment account information
- Marriage certificates, divorce decrees, and custody papers if applicable
If you haven't pre-organized these, take three minutes maximum to grab what you can find. Don't waste precious time searching for every single paper—your priority is getting your family to safety. Missing one document is inconvenient. Missing the evacuation window is dangerous.
Priority 2: Medications and Medical Equipment (Minutes 4-6)
Next, collect all prescription medications, medical devices, and health supplies. This includes insulin and diabetic supplies, inhalers, blood pressure medications, oxygen equipment, mobility aids, hearing aids with extra batteries, and eyeglasses or contact lenses with solution.
If someone in your family requires specialized medical equipment, this becomes your absolute top priority. Many medications cannot be quickly replaced, especially if you're evacuating to another state where your prescriptions may not transfer immediately. Pharmacies in evacuation destinations often run out of common medications within hours of an evacuation order.
Priority 3: Financial Resources (Minutes 7-8)
Grab your emergency cash stash, credit and debit cards, and checkbook. Power outages can last weeks after major hurricanes, rendering electronic payment systems useless. Cash becomes essential when gas stations run on generators and hotels operate on backup systems.
Keep a mix of small bills—twenties, tens, fives, and ones. Breaking a hundred-dollar bill becomes nearly impossible when everyone needs change and registers are running low. Tuck some cash in different bags too, so if you lose one bag, you haven't lost all your money.
Priority 4: Communication and Power (Minutes 9-10)
Gather all cell phones, tablets, and their charging cables. Include portable battery packs (fully charged), car chargers for every device, and a battery-powered or hand-crank radio.
Your phone is your lifeline to emergency information, weather updates, and contact with loved ones. A dead phone battery can leave you dangerously disconnected from critical alerts about changing storm conditions or evacuation route closures. Charge everything fully before you leave, and keep those car chargers handy for the drive.
Minutes 10-20: Water, Food, and Basic Survival Needs
With your life-safety essentials secured, shift focus to survival basics. This ten-minute window is about gathering supplies that will sustain your family for at least three days, though you should plan for longer if possible.
Step 1: Water Collection (Minutes 10-12)
FEMA recommends one gallon of water per person per day for drinking and sanitation . For a family of four, that's twelve gallons for a three-day minimum . If you've been smart and pre-staged cases of bottled water, simply load them into your vehicle.
If not, fill every clean container you can find—empty juice bottles, sports bottles, even clean trash bags placed inside coolers. Don't assume you'll find water at your destination. Stores sell out quickly, and municipal water systems often fail after hurricanes pass.
Consider weight if you're elderly or have mobility limitations. Water is heavy—about eight pounds per gallon. You might need to prioritize a smaller amount you can actually transport, then plan to replenish at your evacuation destination before stores run dry.
Step 2: Food Selection (Minutes 13-15)
Focus on non-perishable items that require no cooking and minimal preparation. Emergency supply kits should be portable in case of quick evacuation . Grab protein bars, peanut butter, crackers, canned tuna or chicken, dried fruit, nuts, and ready-to-eat meals.
Don't forget a manual can opener—electric can openers are useless without power, and you'd be surprised how many people forget this critical tool. Toss in some plastic utensils and paper plates to make eating simpler.
For families with infants, formula and baby food take absolute priority. Bring more than you think you'll need. Stores run out of baby supplies fast, and you don't want to face a hungry infant with empty shelves. For special dietary needs—diabetic-friendly snacks, gluten-free options, or allergy-safe foods—grab those now. You won't find specialized items easily once you evacuate.
Step 3: Light and Medical Supplies (Minutes 16-18)
Collect flashlights and headlamps with extra batteries. The headlamp is particularly valuable because it keeps your hands free. Add glow sticks for children—they provide comfort and visibility without battery drain.
Your first aid kit should include adhesive bandages, antibiotic ointment, gauze pads, medical tape, pain relievers, anti-diarrheal medication, and antacids. Add any over-the-counter medications your family uses regularly—allergy medicine, cold remedies, or stomach aids. Pack a thermometer too. Fever in a crowded shelter requires quick action.
Step 4: Sanitation and Hygiene (Minutes 19-20)
Grab toilet paper, wet wipes, hand sanitizer, garbage bags, and feminine hygiene products. These items are often overlooked in the rush but become critically important when you're staying in crowded shelters or hotels with limited supplies.
Plastic bags serve multiple purposes—waste disposal, waterproofing, and organizing supplies. Grab a box of gallon-size bags and another of trash bags. You'll find dozens of uses for them. Hand sanitizer becomes your best friend when soap and water aren't available.
Minutes 20-25: Clothing and Personal Items
With survival basics covered, you can breathe slightly easier as you gather clothing and comfort items. This five-minute window should focus on practical, weather-appropriate choices.
Weather-Appropriate Clothing
Pack for hot, humid conditions but also include rain protection. Hurricanes bring unpredictable weather, and you might face both sweltering heat and sudden downpours. For each family member, include:
- Three to seven days of comfortable, quick-dry clothing
- Sturdy, closed-toe shoes (not sandals) and thick socks
- Rain jacket or poncho
- One warm layer (temperatures can drop, especially in air-conditioned shelters)
- Underwear and sleepwear
- Hat for sun protection
Avoid packing your nicest clothes. You need functional, durable items that can get dirty or wet without worry. Think camping trip, not vacation resort. Layers work better than bulky items. You can adjust to temperature changes more easily with multiple thin layers.
Personal Hygiene Essentials
Toothbrushes, toothpaste, deodorant, soap, shampoo, and any personal care items you use daily. Travel sizes save space and weight. Don't forget sunscreen—you may be outside more than expected, clearing debris or waiting in lines.
Contact lens wearers should bring extra solution and backup glasses. Shelters can be dusty, and you might need to give your eyes a break from contacts. Pack any special skin care items you need—medications for eczema, acne treatments, or other conditions that flare up under stress.
Children's Comfort Items
Children cope better with familiar comfort items during stressful evacuations . A favorite stuffed animal, blanket, small toy, or book can make an enormous difference in a child's emotional state. These items take minimal space but provide maximum comfort.
Include coloring books, small games, or tablets loaded with movies if you have them. Download content before you leave—internet access may be spotty or unavailable. A calm, occupied child makes the entire evacuation experience less stressful for everyone.
Pet Supplies
If you have pets, their supplies are non-negotiable. Leashes, carriers, food for at least a week, water bowls, medications, vaccination records (required for many shelters), and comfort items like a favorite toy or blanket.
Never leave pets behind—they are family members who depend on you completely. Many shelters now accept pets, but you need current vaccination records to prove they're safe around other animals. Keep those records in your document folder.
Final 5 Minutes: Last-Minute Checks and Vehicle Prep
Your bags are packed and by the door. These final five minutes are about securing what you're leaving behind and ensuring a safe journey ahead.
Step 1: Document Your Home (Minute 25)
Quickly walk through your home with your phone, taking photos or video of valuable items, important areas, and your home's overall condition. This documentation can help with insurance claims if you experience damage.
Capture electronics, furniture, appliances, and any valuable collections. Open closets and cabinets to show their contents. This takes two minutes but can save months of hassle later. Email these photos to yourself or upload them to cloud storage immediately so they're safe even if your phone gets damaged.
Step 2: Secure Valuables (Minute 26)
Move valuable items that you're not taking to interior closets or upper floors if flooding is expected. Unplug electronics to protect them from power surges. If you have time, elevate furniture off the floor using blocks or bricks.
Close all interior doors to minimize wind damage if windows break. Turn off your main water valve to prevent flooding from broken pipes. Adjust your thermostat to 85 degrees to prevent mold growth if power stays on intermittently.
Step 3: Vehicle Check (Minute 27)
Confirm your vehicle has at least a half tank of gas—ideally a full tank. Check that your vehicle emergency kit is present, including jumper cables, basic tools, tire pressure gauge, and spare tire.
Having multiple evacuation routes planned prevents getting trapped in traffic . Load your GPS or phone with alternate routes, but also have a paper map as backup. Technology fails, but paper maps always work. Check your tire pressure quickly—properly inflated tires improve fuel efficiency and reduce breakdown risk.
Step 4: Communication Plan (Minute 28)
Text or call your out-of-state emergency contact with your evacuation destination and expected arrival time. Choose someone outside the hurricane zone who can serve as a central communication point for your family.
Confirm your hotel reservation if you have one. Check your evacuation route one final time for any updates on road closures or contraflow lane activations. Write down key phone numbers on paper in case your phone dies.
Step 5: Final Sweep (Minute 29-30)
Do a final headcount—every family member and pet accounted for? Check that you have your keys, wallet, and phone. Scan the rooms one last time for anything critical you might have missed.
If you have time and ability, knock on neighbors' doors, especially elderly residents who might need assistance. Leave a note on your door for emergency responders indicating you've evacuated and when you left. Lock up and head out. You've done everything you can.
- Essential Documents
- ID, insurance papers, medical records in waterproof container - grab these first
- Life-Saving Medications
- Prescription drugs, inhalers, insulin - critical for health and survival
- Emergency Cash & Cards
- Small bills and credit cards for immediate needs when systems are down
- Basic Clothing & Blankets
- Weather-appropriate clothes and warm blankets - protection from elements
- Communication & Light
- Charged phone, portable charger, flashlight - stay connected and see in dark
What to Leave Behind: Making Hard Choices Quickly
One of the hardest parts of evacuation is accepting what you must leave behind. Understanding what to leave helps you focus on what matters most and keeps your vehicle from becoming dangerously overloaded.
Replaceable Items
Furniture, appliances, kitchenware, and most electronics can be replaced. Yes, you love your couch, but it's not worth risking your family's safety by delaying evacuation to move it or taking up vehicle space that should hold survival supplies.
Focus on what keeps you alive and healthy, not what makes your house look nice. Your television can be replaced. Your grandmother's handwritten recipes cannot. Choose accordingly, but choose quickly.
Heavy, Bulky Possessions
Large televisions, bookshelves, exercise equipment, and other heavy items stay behind. The weight compromises your vehicle's performance and fuel efficiency, both critical during evacuation when gas stations may be scarce or have long lines.
An overloaded vehicle also handles poorly, increasing accident risk on crowded evacuation routes. Pack smart, not heavy. Every pound matters when you're facing a long drive in stop-and-go traffic.
Perishable Food
Empty your refrigerator's most perishable items into the trash before you leave. This prevents horrific smells and health hazards when you return. The food will spoil anyway if power goes out.
Take non-perishables and anything sealed that doesn't require refrigeration. That unopened jar of peanut butter? Take it. The leftover casserole from Tuesday? Toss it. Make the easy calls and move on.
Sentimental Items: The Hardest Choice
This is where evacuation becomes emotional. Photo albums, heirlooms, children's artwork, and irreplaceable mementos are precious but often bulky. If you have small, highly sentimental items that fit easily, take them.
Consider digitizing photos before hurricane season so you always have backups. Scan important documents and family photos to cloud storage throughout the year. But if choosing between grandmother's quilt and your medication, the choice is clear. Your grandmother would want you safe.
The truth is, you can rebuild your house and replace your belongings, but nothing can replace you or your family. Every minute you spend agonizing over possessions is a minute that could save your life on the evacuation route. Make peace with leaving things behind. You're taking what matters most—your family.
After You're Packed: Staying Safe on the Road
You've loaded the car, locked the house, and pulled out of the driveway. Your evacuation isn't over—in many ways, it's just beginning. The journey to safety requires as much attention as the packing process.
Expect delays on evacuation routes. What normally takes two hours might take six or more. Traffic builds quickly as thousands of families hit the road simultaneously. Stay patient. Getting frustrated doesn't make traffic move faster—it just makes the experience more miserable for everyone in your car.
Keep your emergency supplies accessible in the vehicle, not buried in the trunk. Your water, snacks, medications, and first aid kit should be within reach. Children get restless, adults get stressed, and everyone needs access to basics without unpacking the entire car at a rest stop.
Keep your battery-powered radio on or use your phone to monitor weather updates and traffic conditions. Routes can close suddenly due to flooding or accidents, and you need real-time information to adjust your path. Stay flexible. Your planned route might not be your actual route.
Plan your fuel stops strategically. Don't wait until you're on empty. When you hit the half-tank mark, start looking for stations. Lines can be long, and stations can run out of fuel during mass evacuations. If you see a station with reasonable lines, fill up even if you don't desperately need it yet.
Bring entertainment for the drive. Download podcasts, audiobooks, or music playlists before you leave. Car games keep kids occupied. License plate bingo, twenty questions, or storytelling games pass the time without requiring screens or batteries.
Once you reach your destination—whether it's a hotel, shelter, or friend's home—familiarize yourself with that location's emergency procedures. Where are the storm shelters? What's the evacuation plan if conditions worsen? You're safer than you were in the mandatory evacuation zone, but hurricanes are unpredictable, and their impacts extend far beyond the coast.
Check in with your out-of-state contact to let them know you arrived safely. Charge all your devices fully. Settle in, rest, and monitor weather updates. You've done the hard part. Now you wait for the storm to pass and for officials to clear your area for return.
The most important thing to remember as you navigate crowded highways and uncertain conditions is this: you did it. You made the hard choice to leave, you gathered what your family needs, and you're moving toward safety. That 30-minute preparation plan you followed has put you ahead of countless others who waited too long or packed inefficiently. You've given your family the greatest gift possible—the chance to return home together when the storm passes.
Building Your Pre-Season Preparation Kit
The 30-minute evacuation plan works best when you've done some preparation before hurricane season starts. You don't need to become a hardcore prepper or spend thousands of dollars. Just a few simple steps throughout the year make evacuation day much smoother.
Start a document folder specifically for evacuation. Keep copies of all important papers in one waterproof container that lives in an accessible spot—not buried in the back of a closet. Update it annually. When you get new insurance cards or renew your passport, add copies to the folder immediately.
Build a basic emergency kit during regular shopping trips. Buy an extra case of water one week. Grab extra batteries the next. Pick up a few cans of tuna and some protein bars. Spread the cost over several months, and you'll have a complete kit without the sticker shock of buying everything at once.
Create a family communication plan before you need it. Choose an out-of-state contact person everyone can reach. Write down important phone numbers on a laminated card each family member carries. Discuss evacuation destinations and routes during calm moments, not during crisis.
Take photos of your home's contents annually. Walk through each room, open closets and cabinets, and document what you own. Store these photos in cloud storage where they're safe from physical damage. Update them when you make major purchases.
Practice your evacuation plan. Time yourself packing your emergency kit. Drive your evacuation routes during normal conditions so you know the landmarks and exits. Let your kids practice grabbing their comfort items and getting to the car quickly. Practice removes panic.
These small steps throughout the year transform a chaotic 30-minute scramble into a calm, confident evacuation. You're not starting from zero when the alert hits your phone. You're executing a plan you've already prepared.
Ready to take the next step? Start building your evacuation kit this week. Pick one category from this guide—documents, medications, or water—and get it organized. You don't have to do everything at once. Small progress today means you're ready when it matters most.