Protecting Your Basement: Your First Line of Defense Against Flood Damage
The morning after the storm, Jennifer stood at the top of her basement stairs and stared at the water line on the walls—a brown stain marking where eighteen inches of floodwater had invaded her finished basement. The new carpet squelched beneath her feet. Her children's toys floated past storage boxes filled with family photos. The damage estimate would eventually reach $47,000, and that was before she discovered her homeowner's insurance wouldn't cover any of it.
Jennifer's story plays out thousands of times each year across America. Basements are particularly vulnerable to flooding because they are below ground level and water naturally flows downward, seeking the lowest point on your property . Whether the water comes from heavy rainfall overwhelming your drainage system, rising groundwater during spring thaws, or catastrophic flooding from nearby rivers and streams, your basement sits in the direct path of destruction.
The financial stakes are staggering. Basement floods can destroy finished spaces, ruin belongings, and create structural problems that compound over time. But here's what most homeowners don't realize until it's too late: investing in waterproofing now costs far less than repairing flood damage later. You're essentially choosing between paying for prevention now or paying for devastation later.
The good news? Standard flood insurance covers basement improvements like waterproofing systems up to $1,000 under building coverage . While this won't cover a complete waterproofing overhaul, it provides a meaningful starting point for homeowners ready to protect their investment. The key is acting before flood season arrives, not after the water recedes and the damage is done. Every month you delay waterproofing your basement is another month you're gambling with potential losses—and the odds are never in your favor.
Assessing Your Basement's Flood Risk and Current Vulnerabilities
Before you can protect your basement, you need to understand exactly what you're protecting it from. Think of this assessment as a medical diagnosis for your home—you can't prescribe the right treatment until you identify the symptoms and underlying conditions.
Start by examining your basement during and immediately after a rainstorm. This is when water infiltration problems reveal themselves most clearly. Grab a flashlight and systematically inspect every potential entry point. Look for active seepage—water literally weeping through concrete walls or pooling along the floor-wall joint where your basement floor meets the foundation. Check corners especially carefully, as these are natural weak points where two walls meet. Run your hand along the walls (wearing gloves) to feel for dampness even when you can't see obvious water.
Foundation cracks deserve special attention. Not all cracks indicate serious problems—concrete naturally develops hairline cracks as it cures and settles—but any crack wider than 1/8 inch or any crack that shows signs of water staining needs immediate attention. Horizontal cracks are more concerning than vertical ones, as they often indicate structural pressure from soil and water outside your foundation. Take photos of every crack you find and measure them with a ruler so you can monitor whether they're growing over time.
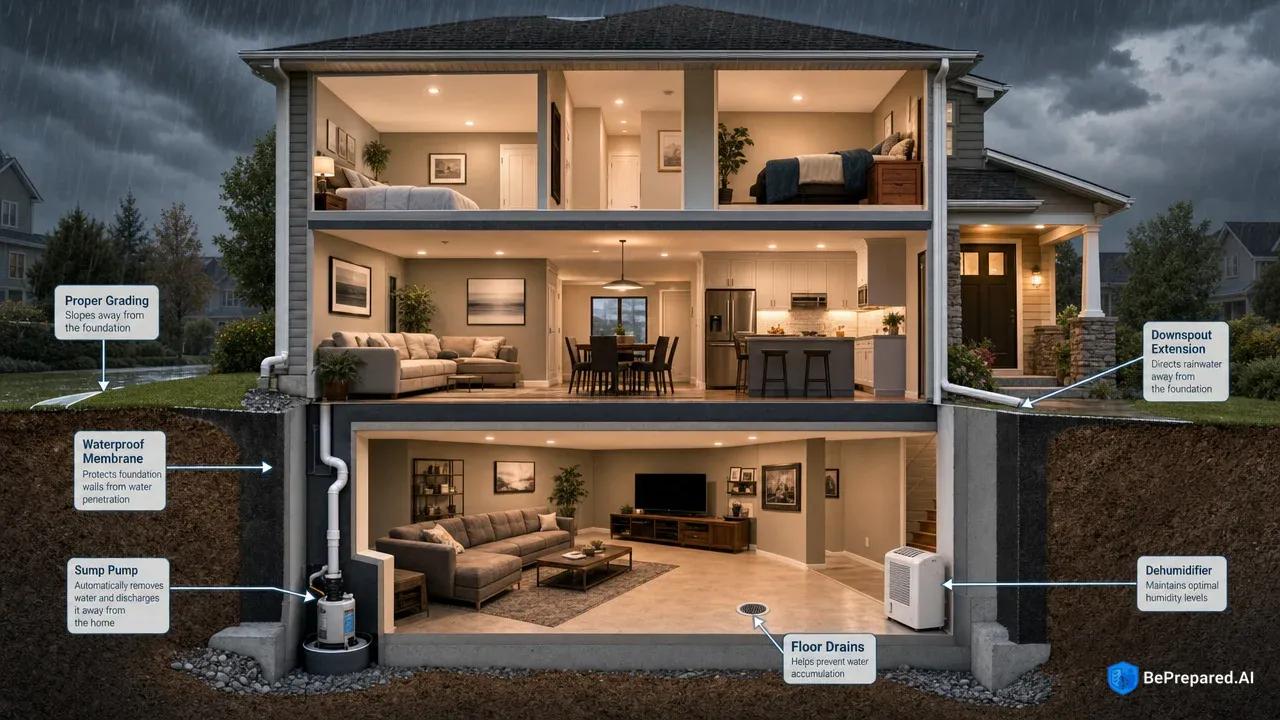
Next, move outside to evaluate your property's drainage and grading. Proper grading should slope away from foundation at 6 inches over first 10 feet . You can measure this yourself with a long board and a level, or simply observe where water flows during rainfall. Does it run away from your house, or does it pool against your foundation? Walk around your entire foundation perimeter looking for low spots, settled soil, or areas where landscaping has created dams that trap water against your walls. Check your downspouts—are they directing water at least six feet away from your foundation, or are they dumping thousands of gallons right next to your basement walls?
Don't forget to assess your existing waterproofing systems, if you have any. Locate your sump pump (usually in a pit in the lowest corner of your basement) and check its operation. Pour a bucket of water into the pit and verify the pump activates automatically. Examine any interior drain tile systems—perforated pipes that run along the inside perimeter of your basement floor—for signs of clogging or damage. Look at your basement walls for evidence of previous waterproofing attempts: interior sealants, drainage channels, or exterior excavation work.
Finally, understand your local flood zone and seasonal patterns. FEMA's Flood Map Service Center provides detailed maps showing whether your property sits in a high-risk flood zone . But don't rely solely on official maps—talk to neighbors who've lived in your area for years. When does flooding typically occur? Does spring snowmelt create problems? Are flash floods common during summer thunderstorms? This local knowledge helps you anticipate when your basement faces the greatest risk, allowing you to time your waterproofing efforts and maintain heightened vigilance during danger periods.
Exterior Waterproofing Solutions: Your Most Effective Defense
If you're serious about keeping water out of your basement, you need to start thinking about defense in depth—and that defense begins outside your foundation walls, not inside them. Exterior waterproofing methods are 3-5 times more effective than interior solutions because they stop water before it ever contacts your foundation. Interior waterproofing manages water that's already penetrated your walls; exterior waterproofing prevents penetration in the first place. The difference is like comparing an umbrella to a towel—one keeps you dry, the other just mops up the mess.
The most fundamental exterior waterproofing measure is proper grading and drainage. This is where many homeowners can make significant progress without professional help. The goal is simple: ensure water flows away from your foundation in every direction. Start by adding soil along your foundation to create that critical six-inch drop over ten feet. Use clay-rich soil rather than sandy soil for the first few feet adjacent to your foundation—clay is less permeable and creates a better water barrier. Compact the soil as you add it to prevent future settling.
Your gutter and downspout system functions as the first line of water management. During a heavy rainstorm, your roof collects enormous volumes of water. If that water dumps directly beside your foundation, you're essentially creating a flood condition right against your basement walls. Install downspout extensions that carry water at least six to ten feet from your foundation, and consider burying downspout drainage pipes that direct water even further away or into a dry well. Clean your gutters regularly—clogged gutters overflow and send cascades of water straight down your foundation walls.
For more comprehensive exterior protection, foundation waterproof coatings and membranes provide a critical barrier. Professional excavation may be required for comprehensive exterior waterproofing —this typically means digging down to your footer (the bottom of your foundation) around the entire perimeter of your basement. It's expensive, disruptive, and absolutely worth it if you're dealing with serious water infiltration problems. Once the foundation is exposed, contractors apply specialized waterproofing membranes—thick, rubberized coatings that bond to your concrete and create an impermeable barrier. They'll also install or repair exterior drain tile (perforated pipes that collect water and direct it away from your foundation) and add a layer of drainage board that creates an air gap between the soil and your waterproofed foundation.
Pros of Exterior Waterproofing:
- Stops water before it reaches your foundation walls
- Addresses the root cause of water infiltration
- Protects foundation structure from water damage
- Adds significant value to your home
- Provides long-lasting protection when properly installed
Cons of Exterior Waterproofing:
- Requires excavation around foundation perimeter
- Higher upfront cost than interior solutions
- Disrupts landscaping and requires restoration
- Not feasible for homes with limited access to foundation walls
- Requires professional installation in most cases
The DIY versus professional decision largely depends on the scope of work. Improving grading, extending downspouts, and adding window well covers are straightforward DIY projects that deliver meaningful protection. Even applying waterproof coatings to exposed foundation walls (in crawl spaces or walk-out basements) is manageable for handy homeowners. But excavation-required exterior waterproofing demands professional expertise and equipment. You're talking about heavy machinery, structural considerations, and waterproofing products that require specific application techniques. A botched DIY excavation job can actually make water problems worse by disrupting drainage patterns or damaging your foundation.
Consider the cost-benefit calculation carefully. Professional exterior waterproofing represents a significant investment, but it can completely solve chronic water infiltration problems and add value to your home. If you're experiencing regular flooding or significant seepage, exterior waterproofing isn't just the most effective solution—it's often the only permanent solution. Interior methods might manage symptoms, but exterior waterproofing addresses the root cause. Unlike many home improvements, waterproofing pays for itself in prevented damage, lower insurance costs, and increased property value.
Interior Waterproofing and Drainage Systems
While exterior waterproofing provides the most effective defense, interior systems offer critical backup protection and are often the more practical option for homeowners facing budget constraints or working with finished basements where exterior excavation would be prohibitively expensive. Think of interior waterproofing as your second line of defense—when water makes it past your exterior barriers, interior systems manage and remove it before it can cause serious damage.
The cornerstone of any interior waterproofing system is a properly installed and maintained sump pump. Installing a sump pump system with battery backup can reduce basement flooding risk by up to 90% when properly maintained . This device sits in a pit at the lowest point of your basement and automatically pumps out water that accumulates, discharging it away from your foundation. A quality sump pump system includes several critical components: the pump itself (choose a 1/3 to 1/2 horsepower model for most residential applications), a sealed sump pit with a cover to prevent debris entry and reduce humidity, a check valve on the discharge pipe to prevent water from flowing back into the pit, and—crucially—a battery backup system that keeps the pump operational during power outages, which often coincide with severe storms.
Sump pump installation requires careful planning. The pit should be at least 18 inches deep and 18 inches in diameter, positioned where water naturally accumulates. The discharge pipe must direct water at least 10-20 feet from your foundation and should include a freeze-proof discharge line if you live in cold climates—water freezing in your discharge pipe can cause the entire system to fail at the worst possible moment. Test your sump pump monthly during flood season by pouring water into the pit until the pump activates. Listen for unusual noises that might indicate bearing wear or impeller damage. Replace backup batteries every 2-3 years before flood season because battery failure during an emergency defeats the entire purpose of having backup power.
Interior drain tile systems work in conjunction with your sump pump to manage water that penetrates your foundation. These systems involve cutting a channel around the perimeter of your basement floor (along the inside of the foundation walls), installing perforated drainage pipe in a bed of gravel, and directing the collected water to your sump pit. The drain tile intercepts water at the floor-wall joint—the most common entry point for basement water—before it can flood your basement floor. Waterproof coatings provide an additional barrier against water infiltration when applied to basement walls after proper surface preparation . These aren't the cheap waterproof paints available at hardware stores; professional-grade coatings like crystalline waterproofing actually penetrate the concrete and form water-blocking crystals within the pores of the material .
When working with waterproof concrete, timing matters. Proper curing of waterproof concrete requires 28 days minimum before flood season to achieve maximum water resistance . Plan your waterproofing projects well in advance of spring thaws or rainy seasons to ensure materials reach full effectiveness before you need them.
Modern technology offers additional protection through flood sensors and automatic water shut-off valves. Flood sensors and automatic water shut-off valves can minimize damage when flooding occurs . Place flood sensors at multiple locations in your basement—near the sump pump, in utility areas, near water heaters and washing machines, and in corners where water tends to accumulate. These sensors connect to alarm systems that alert you to water presence before minor seepage becomes major flooding. Smart sensors can send notifications to your phone, allowing you to respond even when you're away from home. Automatic shut-off valves installed on your main water line can stop water flow when sensors detect flooding, preventing a burst pipe from pumping thousands of gallons into your basement while you're at work or on vacation.
Pros of Interior Waterproofing:
- Less expensive than exterior excavation methods
- Can be installed without disturbing landscaping
- Works well for managing groundwater seepage
- Easier to access for maintenance and repairs
- Can be completed in sections to spread out costs
Cons of Interior Waterproofing:
- Manages water after it reaches foundation walls
- Doesn't protect foundation structure from water exposure
- Requires ongoing maintenance of mechanical systems
- Depends on electricity or battery backup to function
- May not solve severe water infiltration problems
For finished basements, consider installing waterproof wall panels rather than traditional drywall. These panels look like conventional wall surfaces but won't be destroyed by water exposure, allowing you to dry out and resume using your space much faster after a water event. Use vinyl or tile flooring instead of carpet—carpet becomes a sponge during flooding and must be completely removed and replaced, while hard surface flooring can be dried and sanitized.
The key to effective interior waterproofing is understanding that no single component provides complete protection. You need a layered system: drain tile to collect water, a sump pump to remove it, waterproof coatings to reduce infiltration, sensors to provide early warning, and careful material selection to minimize damage when water does enter. Each layer compensates for potential failures in other layers, creating redundancy that protects your basement even when individual components face problems.
- Emergency Supply Checklist
- Comprehensive inventory of essential items including water, food, medications, flashlights, batteries, and first aid supplies with quantity specifications
- Risk Assessment Indicators
- Visual flood level markers, evacuation trigger points, and decision-making criteria based on local conditions and official warnings
Emergency Flood Preparation and Rapid Response Systems
When the National Weather Service issues a flood warning for your area, you don't have days to prepare—you have hours, sometimes minutes. The difference between minor water damage and catastrophic basement flooding often comes down to the actions you take in that critical window between warning and water arrival. Having emergency systems in place and knowing exactly what to do can save thousands of dollars and countless irreplaceable possessions.
Sandbags remain one of the most effective temporary flood barriers, but they only work if you deploy them correctly. Start by placing bags lengthwise and parallel to the water flow direction, overlapping each bag like bricks in a wall. The first row should be slightly below ground level if possible. Stack subsequent rows in a pyramid shape, with each row set back slightly from the one below. A three-foot-high flood barrier requires a base approximately four feet wide. Fill sandbags only two-thirds full—this allows them to mold to each other and the ground, creating a better seal. If you don't have sandbags, heavy-duty trash bags filled with dirt or sand work in a pinch, though they're less durable.
Place sandbag barriers strategically. Seal window wells completely—these are direct pathways into your basement. Create barriers across basement doorways and at the base of exterior basement stairs. If you have a walk-out basement, prioritize the door area with multiple rows of sandbags. Consider modern alternatives like inflatable flood barriers or water-activated flood bags that expand when wet—these store more compactly than traditional sandbags and deploy faster, though they cost more initially.
Emergency water removal equipment should be staged and ready before you need it. Keep a second sump pump on hand as backup—if your primary pump fails during a major flood event, you won't be able to buy a replacement because every store will be sold out. Stock multiple wet/dry vacuums with adequate hose length to reach all areas of your basement. Have a generator available to power pumps and vacuums if electricity fails, and store gasoline safely in approved containers (never run a generator inside your basement or garage—carbon monoxide is deadly). Keep several battery-powered or hand-crank pumps as last-resort options if both electrical power and generator fuel are unavailable.
Protecting utilities and valuable items requires advance planning. Elevate water heaters, furnaces, and electrical panels above potential flood levels when possible. If your equipment sits directly on your basement floor, consider having it relocated to elevated platforms or wall-mounted positions. This work requires licensed professionals but prevents costly equipment replacement and dangerous electrical hazards during flooding. When a flood warning is issued, shut off electricity to your basement at the circuit breaker if water is imminent—electrocution is a serious risk in flooded basements.
Move valuable items to upper floors immediately when flooding threatens. Start with irreplaceable possessions: family photos, important documents, heirlooms, and electronics. Use a systematic approach—designate one person to carry items upstairs while another person gathers them, assembly-line style. Don't waste time making decisions about individual items; when in doubt, move it up. Place items in waterproof containers before moving them if time allows. For large items that can't be moved, elevate them on concrete blocks or tables to get them off the floor.
Create an emergency action plan before flood season arrives. Document the plan in writing and ensure every family member knows their role. Your plan should include: a list of items to move (in priority order), locations of emergency equipment, utility shut-off procedures, evacuation routes if flooding becomes severe, and contact information for emergency services and your insurance company. Practice your plan at least once—actually moving items and deploying barriers—so everyone knows what to do when stress levels are high and time is short. Store emergency supplies in a designated location that won't flood: flashlights, battery-powered radio, first aid kit, drinking water, and important documents in waterproof containers.
Maintenance and Seasonal Preparation Checklist
Effective basement waterproofing isn't a one-time project—it's an ongoing commitment to maintaining the systems that protect your home. Even the best waterproofing installation will fail if you neglect routine maintenance, while diligent upkeep can keep even modest systems functioning effectively for decades. The key is establishing a regular maintenance schedule and sticking to it religiously.
Monthly Tasks (During Flood Season: March-November)
Test your sump pump by pouring a five-gallon bucket of water into the pit and verifying the pump activates automatically and discharges water properly. Sump pumps should be tested monthly during flood season because pump failures typically occur when the unit first activates after sitting idle. Check your battery backup system by unplugging the primary pump and ensuring the backup activates. Battery backup systems fail silently—the only way to know they work is to test them.
Inspect your basement for new cracks, water stains, or musty odors that might indicate developing problems. Early detection prevents minor issues from becoming major failures. Verify that downspout extensions remain properly positioned and haven't been moved by lawn maintenance or weather.
Quarterly Tasks
Clean debris from window wells and ensure covers are securely fastened. Window wells fill with leaves, dirt, and debris that can block drainage and create water reservoirs against your foundation. Inspect exposed foundation walls for new cracks or deterioration of waterproof coatings.
Test flood sensors and alarms to ensure they're functioning and batteries are fresh. Check the discharge point for your sump pump to verify water is flowing away from your foundation and the area isn't becoming saturated or eroded.
Twice-Yearly Tasks (Spring and Fall)
Clean gutters and downspouts thoroughly. Schedule this for late spring after trees finish dropping seeds and pods, and again in late fall after leaves have fallen. Inspect and clean your sump pump pit, removing any debris that has accumulated. Disconnect the discharge pipe and flush the system with clean water.
Examine grading around your foundation and add soil to areas that have settled or eroded. Even properly graded landscapes settle over time and require periodic maintenance. Have your septic system inspected and pumped if applicable—septic backups can cause basement flooding and contamination.
Service your generator: change oil, replace filters, test operation under load, and run it for at least 15 minutes to keep components lubricated.
Annual Tasks
Replace your sump pump battery backup even if it appears functional . Batteries degrade over time and may not hold adequate charge when you need them most. Have your sump pump professionally serviced or consider replacing it if it's more than seven years old. Sump pumps work hard during their lifespan—replace them proactively rather than waiting for failure.
Inspect and reseal foundation cracks that have appeared or expanded. Small cracks become large cracks, and large cracks become water infiltration points. Review and update your flood emergency action plan. Have family circumstances changed? Do you have new valuables in the basement? Are emergency supplies still fresh and accessible?
Verify your flood insurance coverage is adequate and current. Review any changes to flood maps or insurance requirements that might affect your coverage.
Long-Term Planning (Every 3-5 Years)
Have a professional waterproofing contractor inspect your entire system and identify potential upgrades or repairs before problems develop. Consider upgrading older waterproofing components to modern technology. Newer sump pumps are more reliable, modern sensors are smarter, and waterproofing materials continue to improve.
Evaluate whether your basement use has changed in ways that require additional protection. Finishing a previously unfinished basement, for example, dramatically increases the financial stakes of flooding. Reassess your property's drainage patterns. Trees grow, landscaping changes, and neighboring properties develop—all factors that can affect water flow toward your foundation.
Create a personalized preparedness plan based on your location and family needs.
The reality is that basement waterproofing works only when you work at it. Systems fail, weather patterns change, and houses settle. The homeowners who avoid basement flooding aren't necessarily those with the most expensive waterproofing systems—they're the ones who maintain their systems consistently and respond to small problems before they become big disasters. Your basement's protection depends less on what you install and more on what you do every month, every season, and every year to keep those systems functioning at peak effectiveness.
Your basement represents a significant portion of your home's square footage and value. Protecting it from flood damage isn't optional—it's essential home maintenance that pays dividends every time storm clouds gather and rain begins to fall. The waterproofing work you do today, whether installing new systems or maintaining existing ones, determines whether your next major rainstorm results in a minor inconvenience or a financial catastrophe. Choose wisely, act proactively, and maintain diligently. Your basement—and your bank account—will thank you.