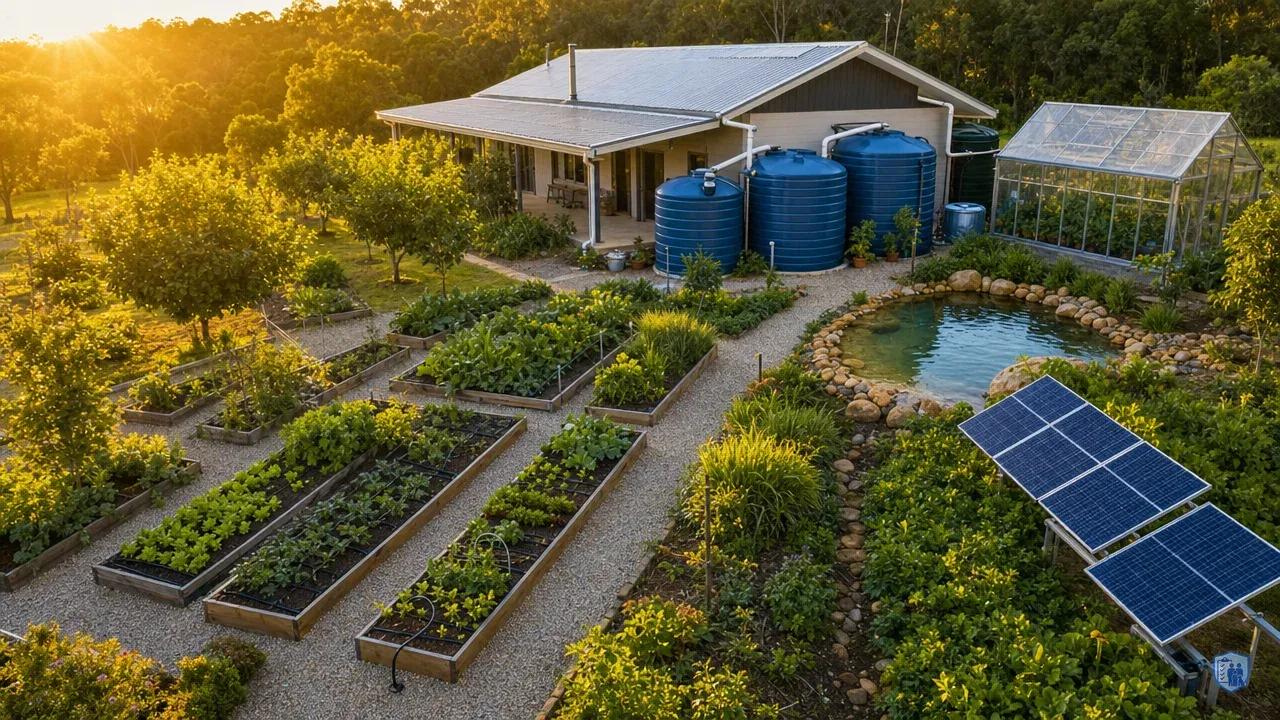
Water Security for One-Acre Self-Sufficiency: Engineering Resilience Against Infrastructure Collapse
Picture this: The financial markets have crashed. Banks have limited withdrawals. Your local water utility, struggling with unpaid bills and supply chain disruptions, has begun rationing service to three hours per day. Within a week, service stops entirely as maintenance crews fail to show up and critical pump stations fail. Your neighbors are panicking, driving miles to find bottled water that disappeared from shelves days ago. Meanwhile, you walk to your backyard, check your storage tanks, and turn on your drip irrigation system. Your vegetables continue growing. Your family has clean drinking water. You've engineered your way out of the crisis.
Water independence isn't a luxury, it's the foundational layer of genuine self-sufficiency. Without reliable water access, your one-acre food production system becomes worthless within days. Your stored food supplies won't matter if you can't cook or maintain basic sanitation. The uncomfortable truth that most preppers discover too late is that water infrastructure fails faster and more completely than almost any other system during economic collapse. Municipal water systems depend on electricity, chemical supplies, spare parts, and most critically, workers who show up for their shifts. When financial systems fracture, these dependencies become fatal vulnerabilities.
The engineering challenge for one-acre self-sufficiency centers on a deceptively simple question: how do you supply adequate water for crop production while simultaneously maintaining household water security, all without depending on external infrastructure? The answer lies in integrated system design that combines high-efficiency irrigation with comprehensive rainwater harvesting, backed by multiple redundancy layers. Each person requires a minimum of one gallon daily for drinking water alone, 365 gallons per person annually . When you add crop irrigation, food preparation, and basic sanitation, the numbers climb rapidly.
The mathematics of water independence become more achievable when you understand that properly designed systems can capture and utilize precipitation with remarkable efficiency. A modest 1,500 square foot roof area in a region receiving 30 inches of annual rainfall can theoretically harvest over 28,000 gallons, substantial capacity from a single passive collection system . When you integrate this with micro-irrigation systems achieving 90-95% application efficiency, suddenly water self-sufficiency transitions from impossible dream to achievable engineering project . The critical factor isn't whether you can achieve water independence, but whether you're willing to invest the resources and planning required before the crisis arrives.
During infrastructure collapse, drilling a well or installing cisterns becomes exponentially more difficult as contractors disappear, supply chains break, and prices skyrocket. Water security must be engineered in advance, tested thoroughly, and maintained religiously. Your life depends on decisions you make today about water systems you'll rely on tomorrow.
Calculating your one-acre water budget: consumption analysis and crisis planning
Before you can design effective water independence systems, you need precise calculations of your actual water requirements across all consumption categories. Vague estimates and hopeful thinking have no place in crisis planning. The numbers matter, and they matter absolutely.
Start with human consumption, the non-negotiable baseline. Each person requires a minimum of one gallon daily for drinking water alone, 365 gallons per person annually, or 1,460 gallons for a family of four . That's survival minimum. For realistic planning that includes cooking, basic hygiene, and food preparation, triple that figure to three gallons per person per day, bringing your family's annual baseline to 4,380 gallons. During crisis scenarios when you're engaging in physical labor, working your acre, processing harvests, and maintaining systems, increase this to four gallons per person daily, or 5,840 gallons annually.
These aren't comfortable numbers. They represent significant water conservation compared to typical American household consumption. You're planning for resilience, not luxury, but you're also planning for sustainability that you can actually maintain long-term. The standard recommendation of one gallon per person per day for a 30-day emergency supply provides 120 gallons for a family of four . For genuine crisis resilience where municipal systems might be offline for months rather than weeks, scale this to 90-180 days of reserves.
Crop water requirements dwarf human consumption. Landscape irrigation accounts for nearly one-third of all residential water use , and intensive vegetable production demands even more. A typical single-family household uses at least 30 percent of their water outdoors for irrigation . The USDA Natural Resources Conservation Service provides detailed crop water requirement tables that allow you to calculate precise needs based on your specific crop plan and local evapotranspiration rates . Leafy greens and root vegetables occupy the lower end of water requirements, while water-intensive crops like tomatoes, cucumbers, and squash demand significantly more.
The efficiency of your irrigation system dramatically impacts actual water requirements. Traditional overhead sprinkler systems achieve only 60-70% application efficiency, meaning 30-40% of water never reaches plant roots due to evaporation, wind drift, and runoff . This inefficiency forces you to apply significantly more water to achieve target crop moisture levels. Microirrigation systems, drip lines and micro-sprayers, achieve 85-95% efficiency, reducing total water requirements by 30-50% compared to sprinklers while often improving crop yields through more consistent moisture delivery . For one-acre operations, this efficiency difference translates to thousands of gallons annually, enough water to supply your family's drinking needs for extended periods.
If your self-sufficiency plan includes livestock, add their requirements to your budget. Agricultural extension services provide detailed water consumption data for various livestock species. Poultry, goats, and other small livestock can add hundreds to thousands of gallons to your annual water budget depending on herd size and production goals. Even modest livestock operations quickly compound your total water requirements.
Emergency reserve calculations require a different framework. At three gallons per person daily, a 90-day supply requires 1,080 gallons of dedicated emergency storage, a substantial but achievable target using multiple 275-gallon IBC totes or similar food-grade containers. This reserve covers drinking and minimal food preparation only. For complete household operations during extended outages, double these figures.
Calculate water loss factors into your system design. Even well-maintained systems lose 5-10% of stored water to evaporation, especially in uncovered reservoirs or tanks exposed to direct sunlight. Filtration and treatment processes waste another 3-5% depending on system type. Factor these losses into your collection and storage capacity planning by adding a 15% buffer to your calculated requirements. This buffer ensures adequate reserves throughout the year despite inevitable system losses.
Seasonal variation significantly impacts water requirements. Summer months may demand three to four times the water volume of spring or fall periods. Your system must handle peak demand periods, not just annual averages. Calculate monthly water budgets based on local climate data, crop growth stages, and household consumption patterns. This granular analysis reveals whether your collection and storage capacity can bridge dry periods between rainfall events.
- Human Consumption: 36,500 gallons/year
- 100 gallons per day for 4-person household including drinking, cooking, hygiene, and sanitation needs
- Vegetable Production: 54,750 gallons/year
- 150 gallons per day for 0.25-acre intensive garden with drip irrigation and seasonal crop rotation
- Emergency Reserves: 10,950 gallons/year
- 30 gallons per day reserve capacity for drought periods, system failures, and contamination events
- System Losses: 15,330 gallons/year
- 15% total loss factor accounting for evaporation, leaks, filtration backwash, and distribution inefficiencies
- Total Annual Requirement: 117,530 gallons
- Complete water budget requiring 322 gallons per day average with seasonal demand variations
- Storage Recommendation: 5,000+ gallons
- Minimum 15-day supply with redundant systems including cisterns, tanks, and backup purification methods
High-efficiency irrigation systems: drip, micro-spray, and automated solutions
The irrigation system you select determines whether your one-acre operation achieves water independence or remains perpetually dependent on external water sources. This isn't about convenience, it's about engineering resilience into the foundation of your food production system. High-efficiency irrigation represents the single most impactful water conservation investment you can make, reducing consumption by 30-50% while simultaneously improving crop health and yields .
Drip irrigation systems deliver water directly to plant root zones through a network of tubing and emitters, minimizing evaporation and eliminating runoff. The basic architecture consists of a main line (typically 3/4" or 1" polyethylene tubing), distribution laterals (1/2" or 5/8" tubing running along crop rows), and individual emitters spaced according to plant requirements. For row crops like tomatoes, peppers, and squash, install emitters every 12-18 inches with flow rates of 0.5-1.0 gallons per hour. For widely spaced plants like cucumbers or melons, use individual emitters at each plant location with 1-2 GPH flow rates.
The USDA provides detailed design specifications for various crop types and soil conditions in their microirrigation practice standards . These technical resources specify emitter spacing, flow rates, and system pressure requirements based on soil texture, crop rooting depth, and climate zone. Proper system design requires matching these specifications to your specific growing conditions rather than using generic installation guidelines.
Component selection matters enormously for long-term reliability. Quality emitters maintain consistent flow rates across elevation changes and pressure variations, ensuring uniform water distribution across your entire acre even on sloped terrain . Standard economy emitters cost less but create significant variation in water delivery, plants at the beginning of your irrigation lines receive excessive water while those at the end struggle with inadequate moisture. For crisis-resilient systems, invest in quality components with built-in check valves that prevent drain-back and root intrusion. Expect to pay $0.25-0.50 per emitter compared to $0.05-0.10 for basic models, but the reliability difference justifies the investment.
Inline drip tubing offers an alternative approach where emitters are pre-installed inside the tubing at fixed intervals (typically 12", 18", or 24"). This design reduces installation time and eliminates individual emitter clogging issues, though it offers less flexibility for varied plant spacing. Inline drip tubing works exceptionally well for row crops with consistent spacing and proves easier to repair in the field, if a section fails, you simply cut out the damaged segment and splice in a replacement. For a one-acre installation, budget approximately $600-1,200 for complete drip irrigation infrastructure including mainlines, laterals, emitters, filters, and pressure regulators.
Micro-spray systems bridge the gap between drip irrigation and traditional sprinklers, delivering water through small spray heads that cover 3-8 foot diameter circles. These systems work well for densely planted beds, orchards, and areas where drip lines prove impractical. Micro-sprays achieve 80-90% efficiency, not quite matching drip irrigation but far superior to overhead sprinklers . Install micro-sprays on short risers (6-12 inches) to keep spray patterns above plant canopies, using flow rates of 5-15 gallons per hour depending on coverage area. For one-acre operations mixing row crops with broadcast-planted beds, consider hybrid systems using drip irrigation for rows and micro-sprays for beds.
Pressure regulation is non-negotiable for system longevity and performance. Drip and micro-spray systems typically operate at lower pressures than household water systems. Install a pressure regulator at your system's inlet to prevent emitter blowouts and ensure consistent performance. For gravity-fed systems operating from elevated storage tanks, every 2.31 feet of elevation provides 1 PSI of pressure . Position tanks at appropriate heights to generate required operating pressure, a tank 46 feet above your field delivers approximately 20 PSI, suitable for most drip systems.
Filtration prevents emitter clogging, the primary failure mode for microirrigation systems. Install a 150-200 mesh screen filter (filtering particles down to 75-100 microns) at your system inlet before the pressure regulator. For water sources with high sediment loads, rainwater harvesting systems, ponds, or wells, add a primary sediment filter (50-100 mesh) upstream of your fine screen filter. Clean filters monthly during the growing season, more frequently if you notice pressure drops indicating restriction. Budget $50-150 for adequate filtration depending on water source quality and system size.
Automation dramatically improves water use efficiency while reducing labor requirements, but creates potential single points of failure during crisis scenarios. Battery-powered irrigation controllers allow you to program precise watering schedules, running different zones for different durations based on crop requirements. Advanced controllers integrate soil moisture sensors that trigger irrigation only when soil moisture drops below preset thresholds, potentially reducing water consumption by an additional 20-30% compared to time-based scheduling . Solar-powered controllers eliminate battery replacement concerns, operating independently for 7-14 days without sunlight using integrated battery banks that recharge during daylight hours.
The crisis-preparedness challenge with automation is maintaining functionality during extended power outages or electronic failures. Design your system with manual override capabilities from the beginning. Install ball valves on each irrigation zone that allow you to manually activate watering by simply opening the valve. Maintain a completely manual backup system, even if it's just a simple garden hose with a spray wand, that can deliver water to critical crops if your primary system fails. Test these manual backups monthly during the growing season. During a genuine crisis, you won't have time to figure out workarounds for systems you've never operated manually.
Maintenance protocols determine whether your irrigation system remains functional for decades or fails within seasons. Before each growing season, pressure-test your system to identify leaks, flush all lines to remove sediment accumulation, and replace worn emitters or damaged tubing sections. During the growing season, walk your entire acre weekly to identify clogged emitters, damaged lines, or areas showing signs of over or under-watering. End-of-season maintenance includes flushing lines, draining all water from the system, and storing above-ground components protected from UV exposure.
In cold climates, winterization is critical, any water remaining in lines will freeze, expand, and crack tubing and fittings. Use compressed air to blow out all lines before winter, or bury lines below frost depth during initial installation. Proper winterization prevents thousands of dollars in freeze damage and ensures your system is ready for immediate operation when spring arrives.
Rainwater harvesting infrastructure: collection, filtration, and storage systems
Rainwater harvesting transforms precipitation from a variable weather pattern into a controllable water asset. For one-acre self-sufficiency, rainwater collection isn't supplemental, it's foundational. A well-designed system can provide substantial portions of your total annual water requirements depending on your climate zone and roof area available for collection . During infrastructure collapse when municipal water disappears and well pumps fail without electricity, your rainwater harvesting system becomes your primary water source.
Catchment area calculations begin with your roof. Every square foot of roof surface collects approximately 0.6 gallons of water per inch of rainfall (accounting for typical collection efficiency losses of 15-20% from evaporation, splash-out, and first-flush diversion) . A 1,500 square foot roof in a region receiving 30 inches of annual rainfall theoretically yields 27,000 gallons, already covering substantial water needs and providing significant irrigation capacity . A 2,500 square foot roof in the same climate produces 45,000 gallons, approaching considerable water independence for a one-acre operation. Calculate your specific potential using this formula: Roof Area (sq ft) times Annual Rainfall (inches) times 0.6 equals Annual Gallons Collected .
Roof material significantly impacts water quality and collection efficiency. Metal roofs provide the cleanest runoff with minimal contamination and highest collection efficiency (85-95%). Asphalt shingle roofs work adequately for irrigation water but leach petroleum compounds and granules that require more aggressive filtration for potable use. Avoid collecting from roofs with lead-based paint, asbestos shingles, or wood treatments containing toxic preservatives. If your existing roof material isn't ideal, consider installing a dedicated collection surface, a simple metal roof structure over a shed or carport specifically designed for water harvesting.
Gutter sizing matters more than most preppers realize. Undersized gutters overflow during heavy rainfall, losing collection capacity exactly when you want to maximize capture. For roof sections up to 1,000 square feet, install 5-inch gutters. For larger roof sections or areas with intense rainfall, upgrade to 6-inch gutters. Use aluminum or galvanized steel gutters rather than vinyl, they last longer and handle thermal expansion better. Install gutters with 1/4 inch slope per 10 feet of run to ensure positive drainage toward downspouts. Plan one downspout for every 600-800 square feet of roof area.
First-flush diverters are non-negotiable for water quality. The initial runoff from any rainfall event carries the highest concentration of contaminants, dust, pollen, bird droppings, leaf debris, and atmospheric pollutants that have accumulated on your roof since the last rain. First-flush diverters automatically separate and discard the first 10-20 gallons of runoff from each downspout before allowing cleaner water to flow into your storage tanks . These devices significantly improve collected water quality by removing the most contaminated portion of each rainfall event. Install diverters that use a simple ball-float mechanism requiring no power or maintenance beyond periodic emptying. Budget $40-80 per downspout for quality first-flush diverters.
Storage tank selection involves balancing capacity, durability, cost, and placement flexibility. Food-grade polyethylene tanks offer the best combination of affordability and safety for potable water storage, available in sizes from 250 to 2,500 gallons. Expect to pay $0.60-1.20 per gallon of capacity for new tanks. For crisis resilience, distribute storage across multiple tanks rather than relying on a single large tank, if one tank fails or becomes contaminated, you haven't lost your entire water supply. A practical configuration for one-acre operations includes 4-6 tanks in the 275-500 gallon range, providing 1,100-3,000 gallons of storage capacity.
Tank placement requires careful consideration of several factors. Locate tanks as close to collection points (downspouts) as practical to minimize conveyance piping. Position tanks on level, compacted surfaces capable of supporting their full weight, water weighs 8.34 pounds per gallon, so a 500-gallon tank weighs over 4,000 pounds when full. Elevate tanks 3-6 feet above ground level to enable gravity-fed distribution and prevent bottom corrosion. For maximum pressure in gravity-fed systems, position tanks at the highest elevation on your property. Shield tanks from direct sunlight to minimize algae growth and plastic degradation, build simple shade structures or paint tanks light colors to reflect heat.
Filtration requirements differ dramatically between irrigation and potable use. For irrigation water, a simple 50-100 mesh screen filter removing large debris suffices. For drinking water, implement multi-stage filtration: sediment pre-filter (5-20 micron) to remove particles, activated carbon filter to remove organic compounds and improve taste, and final UV sterilization or chemical treatment to eliminate biological contaminants. Whole-house style filter housings work well for rainwater systems, providing high flow rates and easy filter replacement. Budget $300-600 for a complete potable-water filtration system.
Distribution and pressure systems determine how effectively you can utilize stored water. For pressurized distribution, install a 12V DC pump powered by solar panels with battery backup, a 3-5 GPM pump provides adequate flow for household use and drip irrigation. Alternatively, rely entirely on gravity-fed distribution by positioning storage tanks 30-50 feet above points of use. This passive approach eliminates pumps, controllers, and electrical components that can fail during crisis scenarios. The trade-off is reduced water pressure and more constrained tank placement options.
Overflow management prevents water damage and mosquito breeding. Install overflow pipes on all tanks, sized to handle maximum possible inflow during intense rainfall. Direct overflow away from building foundations to drainage areas or secondary storage. Screen all overflow outlets with 1/8" mesh to prevent mosquito access. For tanks used seasonally or during extended dry periods, add mosquito dunks containing Bacillus thuringiensis israelensis (Bti), a biological larvicide that kills mosquito larvae without affecting water potability.
System integration connects collection, storage, and distribution components into functional infrastructure. Use food-grade piping throughout, PVC, HDPE, or stainless steel, avoiding materials that leach contaminants. Install shutoff valves at strategic points allowing you to isolate sections for maintenance or repair. Label all valves, pipes, and connections clearly so anyone can operate the system during emergencies. Create a simple schematic diagram showing water flow paths, valve locations, and component specifications. Store this documentation in waterproof containers at multiple locations.
Water treatment and quality management for long-term storage
Water storage without proper treatment protocols creates a false sense of security that can prove dangerous during actual crisis scenarios. Clean water flowing into your tanks today can become contaminated within weeks without appropriate treatment and maintenance. The engineering challenge isn't just storing water, it's maintaining water quality over months or years of storage while planning for emergency treatment of questionable water sources when your primary systems fail.
Physical filtration forms the first defense layer in comprehensive water treatment. Sediment filters remove particles down to 5-20 microns, eliminating visible cloudiness and protecting downstream treatment components from clogging. For rainwater systems, install sediment filters immediately after first-flush diverters to capture fine particles that pass through initial screening. Replace sediment filters every 3-6 months depending on water quality, more frequently if you notice pressure drops or visible discoloration. Activated carbon filters follow sediment filtration, removing organic compounds, chlorine, pesticides, and taste or odor issues through adsorption. Carbon filters require replacement every 6-12 months as adsorption capacity becomes exhausted.
UV sterilization provides highly effective biological treatment without adding chemicals to your water supply. UV systems expose water to ultraviolet light at germicidal wavelengths, disrupting the DNA of bacteria, viruses, and protozoa and rendering them unable to reproduce. Properly maintained UV systems provide excellent disinfection when used according to manufacturer specifications . UV sterilization requires clear water to function effectively, particles and cloudiness shield microorganisms from UV exposure, so always install UV units downstream of sediment and carbon filtration. UV systems require electricity (typically 30-90 watts depending on flow rate) and periodic bulb replacement (annually for most residential units). For crisis scenarios, maintain spare UV bulbs and have backup chemical treatment methods available.
Chemical treatment options for long-term storage balance effectiveness, safety, and shelf stability. Household bleach (sodium hypochlorite) remains accessible for water treatment when used according to EPA or CDC guidelines . For large storage tanks, calculate treatment carefully based on tank volume and bleach concentration. Bleach degrades over time, losing approximately 50% effectiveness per year, so rotate your bleach supply annually. For extended storage beyond 6 months, consider water stabilization products specifically designed for long-term storage. These proprietary formulations prevent biological growth for extended periods without imparting strong taste or requiring frequent rotation.
Testing protocols ensure your stored water remains safe for consumption. Test stored water every 3 months for basic parameters: pH, turbidity, and total coliform bacteria. Home test kits for these parameters cost $30-80 and provide immediate results. For comprehensive testing including heavy metals and chemical contaminants, send samples to certified laboratories annually. This baseline testing identifies problems before they become health hazards and validates that your treatment protocols are functioning correctly. During crisis scenarios when you're relying on stored water daily, increase testing frequency to monthly or implement continuous monitoring if you have the equipment.
Rotation schedules for stored water balance practical logistics against water quality concerns. CDC guidelines recommend proper storage and treatment of emergency water supplies . For large storage volumes, complete rotation becomes logistically challenging, draining and refilling 2,000 gallons of storage requires significant time and water availability. A more practical approach treats stored water with stabilization products during initial filling, tests quarterly to verify continued quality, and rotates water into irrigation use on an annual cycle while refilling with fresh rainwater. This protocol maintains water quality while avoiding the waste and logistics of dumping large volumes.
Emergency purification methods serve as critical backups when primary treatment systems fail or when you need to utilize water from questionable sources. Boiling remains the most reliable emergency treatment, bring water to a rolling boil for one minute at lower elevations, longer at higher elevations, to kill biological contaminants . Boiling requires fuel and time but works regardless of water chemistry or turbidity. Portable water filters using hollow-fiber membrane technology (0.1-0.2 micron pore size) provide effective emergency treatment, removing bacteria and protozoa while maintaining reasonable flow rates. Units like the Sawyer Mini or LifeStraw filter thousands of gallons before requiring replacement. Chemical purification tablets (chlorine dioxide or iodine-based) offer lightweight, shelf-stable emergency treatment, though they require extended contact times and can impart taste issues.
System maintenance determines long-term reliability. Every 6 months, inspect all storage tanks for signs of contamination, sediment accumulation, or structural issues. Clean tanks annually by draining completely, scrubbing interior surfaces with a mild bleach solution, rinsing thoroughly, and refilling. Inspect and clean all filters, screens, and first-flush diverters. Test UV bulbs with intensity meters and replace when output drops below manufacturer specifications. Verify that all valves, pumps, and distribution components operate correctly. Document all maintenance activities and testing results, this log helps identify developing problems and validates system reliability.
Troubleshooting common water quality issues requires systematic diagnosis. Cloudy or turbid water indicates inadequate sediment filtration, check and replace sediment filters, verify first-flush diverters are functioning, and clean roof surfaces if necessary. Foul taste or odor suggests organic contamination, replace activated carbon filters and verify that tanks are properly sealed against debris and insects. Algae growth in tanks indicates excessive light exposure, improve tank shading and consider adding light-blocking covers. Slime or biofilm accumulation suggests inadequate disinfection, increase chemical treatment concentration and clean tanks thoroughly. Each of these issues is solvable with proper diagnosis and corrective action, but only if you're monitoring your system actively rather than assuming it continues functioning correctly.
Water quality documentation creates accountability and tracks system performance over time. Maintain a logbook recording all treatment activities, test results, maintenance procedures, and observations. Note dates, specific actions taken, and any anomalies observed. This documentation proves invaluable for troubleshooting recurring problems and demonstrates due diligence in maintaining safe water supplies. During crisis scenarios, this historical data helps you make informed decisions about water safety when professional testing becomes unavailable.
- Pre-Filtration & Debris Removal
- First flush diverters, leaf screens, and coarse sediment filters remove large contaminants and organic matter from collected rainwater
- Multi-Stage Filtration System
- Progressive filtration through sand, activated carbon, and ceramic filters to eliminate suspended particles, chemicals, and biological contaminants
- UV Sterilization Chamber
- High-intensity ultraviolet light exposure destroys bacteria, viruses, and other pathogens without chemical additives
- Reverse Osmosis Purification
- Semi-permeable membrane system removes dissolved salts, heavy metals, and microscopic contaminants for maximum purity
- Final Polishing & Remineralization
- Activated carbon polishing and mineral cartridge addition to enhance taste and restore beneficial minerals
- Quality Testing & Storage
- TDS meters, pH testing, and bacterial sampling verify water safety before transfer to sanitized storage tanks
System integration and crisis redundancy: manual overrides and backup protocols
The difference between a water management system and a crisis-resilient water independence system lies entirely in integration and redundancy. Individual components, drip irrigation, rainwater tanks, filtration systems, provide value in isolation. Integrated together with proper backup protocols, they create genuine resilience against infrastructure collapse. This integration requires careful planning around interconnections, manual override capabilities, and failure mode analysis that most preppers overlook until crisis conditions expose their system's vulnerabilities.
Connecting irrigation and rainwater systems creates operational efficiency and flexibility. Install distribution manifolds that allow you to route water from multiple sources (rainwater tanks, well, municipal connection if available) to multiple destinations (drip irrigation zones, household use, livestock watering). Use ball valves at each connection point to enable manual selection of source and destination. This configuration allows you to prioritize water allocation during shortages, directing limited supplies to critical crops and drinking water while suspending irrigation of less essential areas. A practical manifold setup includes 3-4 input connections and 4-6 output zones, providing the flexibility to adapt to changing conditions without replumbing your entire system.
Manual operation procedures for power outages separate functional systems from failed systems. Every automated component in your water management system, pumps, controllers, solenoid valves, should have a manual bypass or override. Install manual ball valves parallel to electric solenoid valves so you can open irrigation zones by hand. Position storage tanks to enable gravity-fed distribution even when pumps are non-functional. Create written procedures documenting manual operation steps for each system component, and store these instructions in waterproof containers at multiple locations. Test manual operation monthly during the growing season, actually shut off power and operate your system manually to verify that procedures work and identify any gaps in your backup capabilities.
Backup water sources provide ultimate redundancy. Even comprehensive rainwater harvesting systems face limitations during extended drought. Plan secondary and tertiary water sources before crisis conditions arrive. A hand-pumped well offers excellent backup, you can access groundwater without electricity, though flow rates are limited (typically 3-5 gallons per minute). Develop relationships with neighbors who have ponds, streams, or other water sources and establish mutual aid agreements for emergency access. Know the location of natural water sources within a 5-mile radius of your property, springs, streams, lakes, and maintain filtration equipment capable of treating this water for drinking. Store 1,000-2,000 gallons of emergency water reserves separate from your working storage, treated for long-term storage and accessed only during genuine crisis conditions.
System monitoring and early warning indicators help you identify developing problems before they become critical failures. Install simple pressure gauges at key points in your system, after filters, at manifolds, at the start and end of irrigation zones. Pressure drops indicate clogging, leaks, or pump failures. Monitor storage tank levels weekly during dry periods to verify that consumption doesn't exceed collection rates. Track irrigation run times and compare against historical patterns, increasing run times to achieve adequate watering suggest system efficiency losses. During the growing season, walk your entire acre twice weekly looking for signs of water stress, over-watering, or equipment failure. These simple monitoring practices provide early warning when intervention can prevent minor issues from becoming system failures.
Maintenance schedules and spare parts inventory determine whether you can repair failures quickly or watch your crops die while waiting for parts. Create a detailed maintenance calendar documenting required tasks monthly, seasonally, and annually. Stock critical spare parts: replacement emitters, tubing repair couplings, filter cartridges, pressure regulators, valve diaphragms, and pump seals. For one-acre operations, budget $300-500 for a comprehensive spare parts inventory. Store spare parts in organized containers with clear labeling. Maintain basic repair tools specific to your system: tubing cutters, hole punches for emitter installation, wrenches sized to your fittings, and PVC cement if you use PVC piping. During crisis scenarios, replacement parts become unavailable, your spare parts inventory determines whether you can maintain operations or watch your water security collapse.
Seasonal adjustments optimize system performance across changing conditions. In spring, gradually increase irrigation frequency and duration as plants establish and temperatures rise. Summer requires maximum irrigation, often daily or every other day during peak heat. Fall allows irrigation reduction as temperatures cool and plants mature. Winter in cold climates requires complete system shutdown and winterization. Adjust your rainwater collection priorities seasonally, during wet seasons, prioritize filling storage tanks to maximum capacity; during dry seasons, use collected water more freely for irrigation knowing that tank refilling will occur with next rainfall. These seasonal adjustments require active management rather than set-it-and-forget-it automation.
Winterization prevents catastrophic freeze damage in cold climates. Before first hard freeze, drain all above-ground piping, irrigation lines, and filters. Use compressed air to blow out remaining water from drip lines and manifolds. Remove and store irrigation controllers, battery-powered valves, and other electronic components indoors. Drain rainwater storage tanks or install tank heaters to prevent freezing (though this requires electricity). Disconnect and drain all pumps, storing them indoors or in heated spaces. Cover exposed piping with insulation. The investment in proper winterization, typically 4-8 hours of labor in fall, prevents thousands of dollars in freeze damage and ensures your system is ready for immediate operation when spring arrives.
Test your integrated system under realistic crisis scenarios before you actually face those conditions. Conduct quarterly drills where you operate your entire water management system manually without electricity. Time how long it takes to irrigate your one-acre plot using manual valves and gravity-fed distribution. Verify that your emergency water treatment methods actually work and that you have adequate fuel, filters, or chemicals to treat water for extended periods. Identify gaps in your backup protocols, components without manual overrides, missing spare parts, procedures that work on paper but fail in practice. Integrated water management systems with proper redundancy can maintain substantial functionality during extended power outages, but only if you've engineered and tested that redundancy before crisis conditions arrive.
Implementation timeline and investment strategy for water independence
Water independence isn't achieved in a weekend, it requires phased implementation over multiple seasons, allowing for system testing, refinement, and budget distribution. Attempting to install complete one-acre water management systems in a single implementation phase typically results in design errors, inadequate testing, and budget overruns. A strategic approach spreads investment and labor over 18-24 months while building functional capacity incrementally.
Phase One (Months 1-3) focuses on assessment, design, and critical infrastructure. Begin with detailed water budget calculations specific to your property, crops, and family size. Map your property identifying roof areas for rainwater collection, optimal locations for storage tanks, and irrigation zone layouts. Test your soil to determine water holding capacity and infiltration rates, this data drives irrigation system design. Install your first rainwater storage capacity (1,000-2,000 gallons) and basic filtration for irrigation use. Establish one or two irrigation zones covering your highest-priority growing areas using drip or micro-spray systems. Budget $2,500-4,000 for Phase One including initial storage tanks, basic filtration, and irrigation infrastructure for 20-30% of your acre.
Phase Two (Months 4-9) expands irrigation coverage and adds system automation. Install remaining irrigation zones to cover your full acre, incorporating lessons learned from Phase One operation. Add irrigation controllers and soil moisture sensors to optimize water application. Expand rainwater storage to 3,000-5,000 gallons total capacity, positioning additional tanks to improve distribution and redundancy. Upgrade filtration systems for potable water capability if you plan to use rainwater for drinking. Install pressure regulation and distribution manifolds connecting multiple water sources to multiple irrigation zones. Budget $3,000-5,000 for Phase Two, bringing your total investment to $5,500-9,000.
Phase Three (Months 10-18) completes system integration and adds crisis redundancy. Install manual overrides and backup systems for all automated components. Establish backup water sources, drill a well, install a hand pump, or develop agreements for emergency water access. Add UV sterilization or advanced treatment for potable rainwater use. Install emergency water storage (1,000-2,000 gallons) treated for long-term storage and reserved for crisis scenarios. Implement system monitoring, pressure gauges, flow meters, and tank level indicators. Acquire comprehensive spare parts inventory and repair tools. Budget $2,500-6,000 for Phase Three, bringing total investment to $8,000-15,000 for a complete, crisis-resilient one-acre water management system.
Cost analysis and ROI calculations justify this investment even without considering crisis scenarios. Municipal water for one-acre irrigation costs hundreds of dollars annually depending on local rates and climate. A comprehensive water independence system achieves payback over time through eliminated water bills, though not compelling economics in normal times. The genuine value lies in water security during infrastructure disruption. When municipal systems fail, your water independence system provides value that can't be measured in dollars, it keeps your family fed and hydrated when neighbors are desperate. From a crisis preparedness perspective, water independence systems offer better ROI than almost any other preparedness investment because water scarcity develops quickly and alternatives are extremely limited once crisis conditions arrive.
Permit requirements and code compliance vary dramatically by jurisdiction. Many rural areas allow rainwater harvesting and irrigation systems without permits. Urban and suburban locations often require permits for plumbing work, electrical installations, and large water storage. Some jurisdictions restrict rainwater harvesting entirely or impose treatment requirements for potable use. Research local regulations before beginning implementation, surprises mid-project create expensive delays. In areas with restrictive regulations, consider whether full code compliance serves your crisis preparedness goals. Systems installed without permits may face enforcement action during normal times but become irrelevant concerns during genuine infrastructure collapse.
Contractor selection versus DIY considerations depend on your skills, available time, and system complexity. Experienced preppers with basic plumbing and electrical skills can install complete water management systems DIY, saving 40-60% compared to contractor installation. Hire contractors for specialized work beyond your capabilities, well drilling, electrical service upgrades, or complex automation systems. When hiring contractors, prioritize those with irrigation or agricultural water system experience rather than residential plumbers. Clearly communicate your crisis-resilience requirements, many contractors will design systems optimized for convenience and automation without considering manual operation capabilities or redundancy.
Performance monitoring and optimization continue long after initial installation. Track water consumption by zone and crop type to identify inefficiencies. Monitor crop health and adjust irrigation schedules based on plant response rather than rigid timers. Measure rainwater collection volumes and compare against theoretical calculations to verify system efficiency. Calculate actual water independence percentage, the portion of your total water requirements supplied by rainwater harvesting versus external sources. Continuously refine your system based on this performance data, adjusting emitter spacing, irrigation duration, and storage capacity to optimize results.
Long-term expansion planning recognizes that water requirements change as your self-sufficiency operation evolves. Initial one-acre vegetable production may expand to include orchards, requiring different irrigation approaches. Livestock additions increase water requirements substantially. Growing family size increases household consumption. Plan your initial system with expansion capacity, oversized manifolds, additional tank connection points, and irrigation controllers with unused zones. This forward planning allows incremental expansion without rebuilding core infrastructure.
Properly implemented water management systems can achieve genuine water independence within 18 months in most climates. The timeline depends less on installation complexity and more on seasonal cycles, you need to experience full wet and dry seasons to verify that collection capacity meets consumption requirements. The investment of $8,000-15,000 seems substantial until you consider the alternative: complete water dependence during infrastructure collapse. For serious preppers committed to one-acre self-sufficiency, water independence isn't optional, it's the foundation that makes all other preparedness investments viable.
Documentation and knowledge transfer ensure your water system remains functional even if you're incapacitated or absent. Create comprehensive system documentation including component specifications, installation diagrams, operating procedures, maintenance schedules, and troubleshooting guides. Store multiple copies in different locations, waterproof containers at your property, digital backups off-site, and printed copies with trusted family members. Train multiple people in system operation and maintenance. Your water independence system only provides security if others can operate it when you're unable to do so.
- Phase 1: Assessment & Foundation (Months 1-6)
- Site evaluation, water testing, permits acquisition, and basic infrastructure setup. Budget: $15,000-25,000. Deliverables: Well drilling/spring development, initial filtration system, 500-gallon storage capacity.
- Phase 2: System Expansion (Months 7-12)
- Advanced purification systems, backup power integration, and storage scaling. Budget: $20,000-35,000. Deliverables: Multi-stage filtration, solar/generator backup, 2,000-gallon capacity, distribution network.
- Phase 3: Optimization & Redundancy (Months 13-18)
- System automation, secondary source development, and long-term sustainability measures. Budget: $10,000-20,000. Deliverables: Smart monitoring, rainwater harvesting, 5,000+ gallon capacity, maintenance protocols.
- Critical Milestones & ROI Markers
- Key decision points: Month 3 (source viability), Month 9 (system performance validation), Month 15 (independence verification). Total investment: $45,000-80,000 for complete water autonomy.
- Risk Mitigation & Contingency Planning
- 15% budget buffer allocation, alternative source identification, equipment failure protocols, and seasonal variation preparations. Includes legal compliance and neighbor relations management.
- Long-term Maintenance & Sustainability
- Annual maintenance budget ($2,000-4,000), equipment replacement schedules, skill development requirements, and system expansion opportunities for increased property value and resilience.